
Modern authentication (not only) in SharePoint Online becomes more and more relevant as more and more organizations turn off LegacyAuthentication. In fact this means the classic Credential authentication with UserName and Password does not work anymore.
The issue is, when connecting with SharePoint Designer or PowerShell with classic credentials you will receive a “Cannot contact web site or the web site does not support SharePoint Online credentials” error.
The setting that handles this is the following:
Connect-SPOService -Url "https://<Your-Tenant>-admin.sharepoint.com"

$tenantsettings = Get-SPOTenant

$tenantsettings.LegacyAuthProtocolsEnabled
If this setting is False you cannot login with classic credentials. To change this you could run
Set-SPOTenant -LegacyAuthProtocolsEnabled $true
For Microsoft.Online.SharePoint.PowerShell the story ends here for now as it does not work with modern authentication especially in an unattended mode such as Azure Automation runbooks.
Luckily the more popular PowerShell module in case of SharePoint Online is PnP-PowerShell. This module provides capabilities for an unattended authentication towards SharePoint Online. In this blogpost I will show you how to handle this inside an Azure Automation runbook.
According to Microsoft’s PnP documentation for an app only permission authentication you would need the following things to get this scenario up and running. I will show you each of them and point out the “Azure Automation specifics”.
Create a self-signed certificate
Here you can either use a script or (much simpler) the new New-PnPAzureCertificate cmdlet. For instance run the following:
$Password = "******"
$secPassword = ConvertTo-SecureString -String $Password -AsPlainText -Force
$cert = New-PnPAzureCertificate -Out "AzureAutomationSPOAccess.pfx" - `
 -ValidYears 10 `
 -CertificatePassword $secPassword
 -CommonName "AzureAutomationSPOAccess" `
 -Country "DE" `
 -State "Bavaria"
This would create a self-signed certificate with the needed values and, enforced by the “-out” parameter, write it to a .pfx file in the current directory.
After that simply run the following command and keep the window open. We would need the JSON result (shortened here) a in a minute.
$cert.KeyCredentials

{
    "customKeyIdentifier": "zUFQhchR6FJ0...",
    "keyId": "4d2fe8fc-0dbb-45a7-...",
    "type": "AsymmetricX509Cert",
    "usage": "Verify",
    "value":  "MIIDJDCCAgygAwIBAgIQV9qo..."
}
Register an Application
The next thing would be to register an app in your Office 365 Azure AD. Simply go to your Office 365 Admin Center and from there down below on the left side under “Admin Centers” to the “Azure Active Directory” admin center.
Here I encourage you now to use the new “App registrations (preview)” version and register an application.
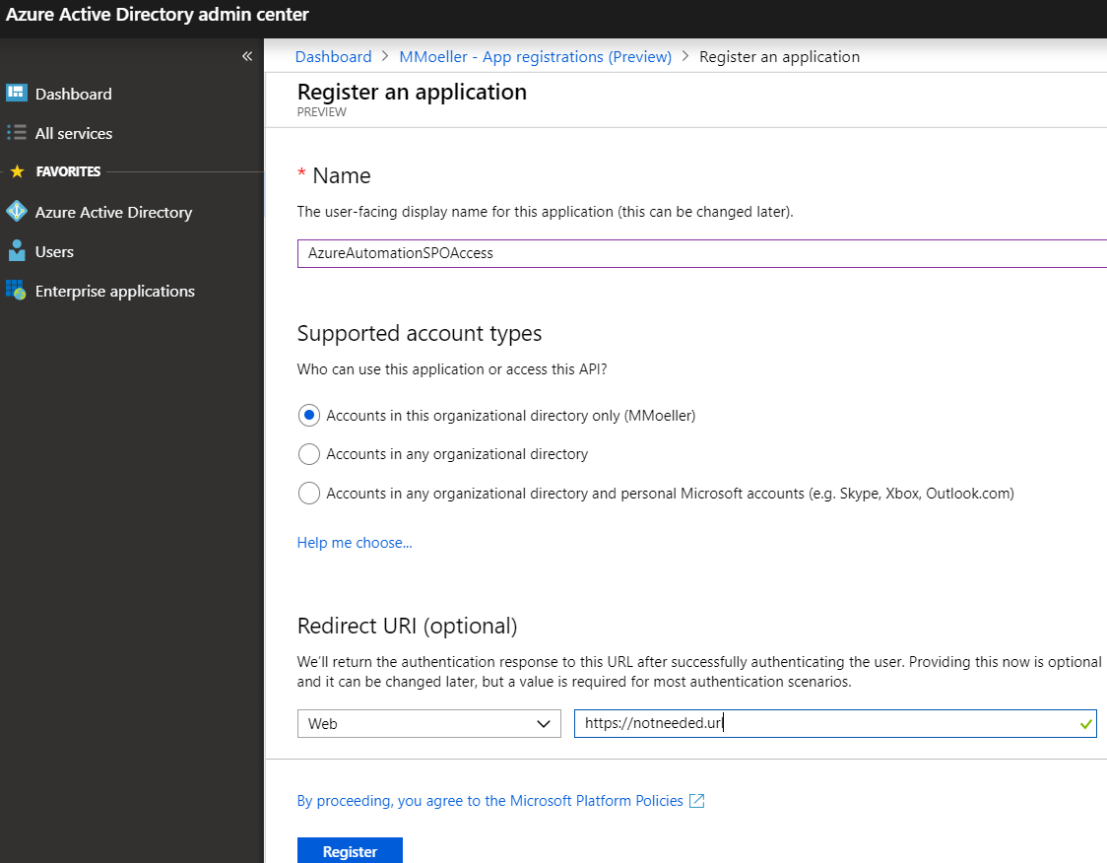
Here only the “Name” is really relevant for us. Once you have that, you would need to give permissions to that app registration.
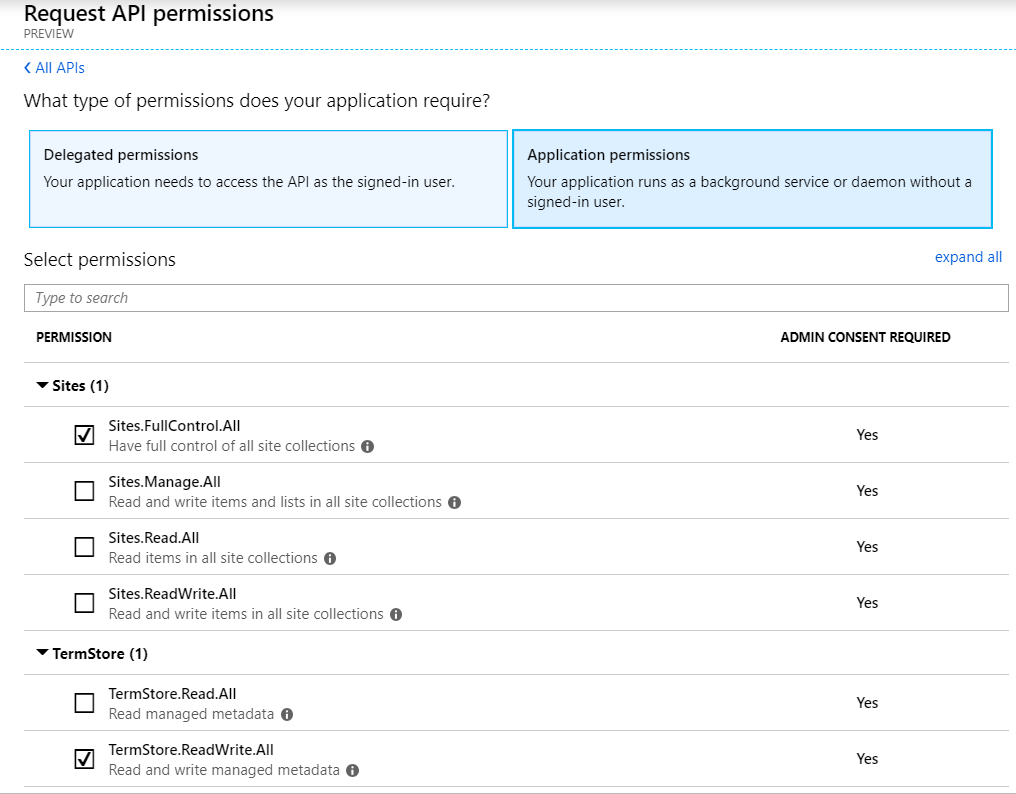
Assuming you want to create lots of runbooks with several admin scenarios the selected permissions would be necessary. If you only have specific needs you might reduce it to a lower level. Pay attention to check “Application permissions” as we cannot handle a delegated scenario.

Anyway, any given SharePoint permission needs an administrator consent. Simply click the button but make sure you are a tenant administrator.

Then your permissions should be granted.
Next we would need to add our “KeyCredentials”. This “relates” our app registration to the recently created certificate. So switch back to our left open PowerShell window and copy the JSON output. Then switch to the app registration’s manifest and insert it there inside the [] .
At the moment of writing there was an issue with the “Preview” version of the App registration. If you receive the error “Failed to update application SPAccess. Error details: KeyValue cannot be null or empty” you can simply re-open your app registration in the classic mode, insert it there and save. Switch back to the preview mode and there are even more parameters now:

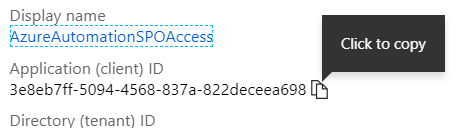
The final thing would be to copy the App Id. Therefore switch to the “Overview” tab. Here you can copy the ID to the clipboard once we need it in another minute.
Automation Account settings
PnP PowerShell module
I assume you already have an Automation Account configured. If not follow the documentation from Microsoft. On top you should install the PnP PowerShell module under modules. Simply install it on your local machine and then ZIP the local folder “C:\Program Files\WindowsPowerShell\Modules\SharePointPnPPowerShellOnline” and upload it under “Modules” in your Automation Account.
Upload pfx certificate
Now under “Certificates” upload your recently created certificate (the .pfx file). Therefore you would need the given name and the password.

Pay attention to check “Yes” for Exportable as we later need exactly this capability!
Finally I would like to store our App ID as well as the password for the certificate inside the Azure Automation Account assets. Although both values do not exactly belong together, you can store them as a simple credential pair. We later use them independently.

The Runbook – PnP PowerShell Commands
Now we have everything in place to create our first runbook with modern app only authentication. Therefore create a new PowerShell runbook and insert the following code:
$azureSPOcreds = Get-AutomationPSCredential -Name 'AzureAutomationSPO'

$siteUrl = "https://.sharepoint.com/teams/MMTeamNo1"

$aadDomain = ".onmicrosoft.com"

$Password = $azureSPOcreds.GetNetworkCredential().Password

$secPassword = $azureSPOcreds.Password

$clientID = $azureSPOcreds.UserName

$cert = Get-AutomationCertificate -Name 'AzureAutomationSPOAccess'

$pfxCert = $cert.Export(3 ,$Password) # 3=Pfx

$certPath = Join-Path "C:\Users" "SPSiteModification.pfx"

Set-Content -Value $pfxCert -Path $certPath -Force -Encoding Byte


if (Test-Path $certPath)

{

    $pnpCert = Get-PnPAzureCertificate -CertificatePassword $secPassword `
					-CertificatePath $certPath

    Write-Output "Connecting to $siteUrl"

    Connect-PnPOnline   -CertificatePath $certPath `

                        -CertificatePassword $secPassword `

                        -Tenant $aadDomain `

                        -ClientId $clientID `

                        -Url $siteUrl

    $web = Get-PnPWeb

    Write-Output $web.Title

}

else

{

    Write-Output "No Cert"

}
For simplicity reasons I put some other values in as hardcoded which you would also put to different Automation variables (or ONE as a config XML).
The first interesting thing is getting the $azureSPOcreds. After retrieval we extract the UserName on the one hand, that is our AppID. On the other hand with two commands we extract the password, once simply as a SecureString by retrieveng the Password attribute and give it to the $secPassword variable. Then with the help of the GetNetworkCredential() method we also extract the password in PlainText (!!!) and give it to the $Password variable. We need it that way for the certificate.
But here you see a disadvantage of the Azure Automation assets. Once you have some Admin credentials in there AND access to it, you also have the clear text password! 😉
The next trick we use is to export the certificate to the “local filesystem of the Automation account” which is only valid during runtime of a runbook execution.
This is because the Connect-PnpOnline command we use next expects it that way and cannot handle a X509Certificate2 object directly (that is what we get with the Get-AutomationCertificate cmdlet).
Once we have that exported we simply ‘Test-Path’ our export and if everything is fine we can Connect-PnPOnline to our SharePoint and execute a simple demo task to get the current web’s title.

We actually just had that issue, Markus! Thanks for that article!
LikeLiked by 1 person
Hello Markus,
thank you for providing this awesome explanatory blog post. It helped me a lot. 🙂
Following along your explanations, I had some struggles and hurdles.
1.
First of all, the New-PnPAzureCertificate changed to allow file output to .cer and .pfx.
(Important later on)
Connect-PnPOnline -Url “https://$tenant-admin.sharepoint.com” -UseWebLogin
$Password = “********”
$secPassword = ConvertTo-SecureString -String $Password -AsPlainText -Force
$cert = New-PnPAzureCertificate -OutPfx “SPOAccessAzureAutomation.pfx” -OutCert “SPOAccessAzureAutomation.cer” `
-ValidYears 10 `
-CertificatePassword $secPassword `
-CommonName “SPOAccessAzureAutomation” `
-Country “DE” `
-State “Saxony” `
-Locality “Dresden” `
-Organization “*******” `
-OrganizationUnit “*******”
.\AzureAutomationSPOAccess.pfx #see: https://github.com/SharePoint/PnP-PowerShell/tree/master/Samples/SharePoint.ConnectUsingAppPermissions
2. Register an Application – Modifying Manifest
I used a different approach to modify the manifest because $cert.KeyCredentials is missing the key value pairs for startDate and endDate.
I went to tab “Certificates & secrets” and uploaded the previously exported “SPOAccessAzureAutomation.cer” as the upload dialogue does only allow the following file types: .cer, .pem, .crt.
After I uploaded the certificate accordingly, I copied the certificate thumbprint.
3. Azure Automation Account
In the Azure Automation Account, I followed along your steps to upload the “SPOAccessAzureAutomation.pfx” file.
Furthermore, I created an encrypted AutomationVariable for the certificate thumbprint (see 2. Register an Application – Modifying Manifest).
This github article “Connect to the SharePoint Online using Application Permissions”, section “Test the application using PnP” shows an alternative way to Connect-PnpOnline by means of the clientID and the certificate thumbprint:
Connect-PnPOnline -Tenant $aadDomain -ClientId $clientID -Thumbprint $certThumbprint -Url $siteUrl
Link:
https://github.com/SharePoint/PnP-PowerShell/tree/master/Samples/SharePoint.ConnectUsingAppPermissions#test-the-application-using-pnp
Advantage:
You have no need to expose the password in plain text.
You simply need to adjust the Runbook script:
# add:
$certThumbprint = Get-AutomationVariable -Name ‘AzureAutomationSPOAccess_Thumbprint’
# modify:
Connect-PnPOnline -Tenant $aadDomain -ClientId $clientID -Thumbprint $certThumbprint -Url $siteUrl
Works like a charm on my side 🙂
Best regards,
Markus
LikeLike
Thanks for your great and substantial comment @Markus. You are totally right about that alternative.
I used a similar Approach in another Scenario / blogpost where I Need PnP PowerShell and modern authentication: When deploying SPFx in Azure DevOps. Here I cannot store any files.
https://mmsharepoint.wordpress.com/2019/01/18/deploy-spfx-app-package-to-sharepoint-from-azure-devops-with-modern-authentication/
the only Thing where I do not agree with you is your ‘advantage’ about the password because for me it doesn’t matter if I have a cert pwd, a thumbprint or PEMCertificate/PEMPrivateKey at Hand. I can use all of that stuff to authenticate to SPO directly.
What I would love to see in Azure Automation is managed identities and Azure KeyVault.
Do Nothing else anymore in Azure Functions.
LikeLike
Hi Thank you for this post. I can’t find how to import .pfx certificate in Azure ? I’m blocked in this step. Any help ?
Why we need an automation account ?
Can we call our azure function secured from SPFx Web Part ? Any example ?
LikeLike
If you want to use Azure Automation and runbooks you need an Azure Automation Account as the starting point or container for Holding your runbooks (which are the executing PowerShell scripts). The Azure Automation Account holds the (reusable) resources for your runbooks such as credentials or with it a certificate (under “Upload pfx certificate” it is described and this steps applies to an existing Azure Automation account).
Finally you cannot call an Azure runbook (this is what we are Talking About here, not Azre functions) directly from SPFx. You could enable your runbook to be called as a Webhook like shown in another post
https://mmsharepoint.wordpress.com/2017/11/26/call-an-azure-runbook-by-webhook-from-microsoft-flow-to-update-a-sharepoint-listitem/
But calling it directly would fail with CORS issue.
You need something in the middle such as a Flow or an Azure Function with Managed Code.
Benefit of a runbook itself against an Azure Function is the easier setup or the longer possible runtime (not Talking About Durable Functions Right now)
LikeLike
Very helpful !!
Can we manage this certificate from Azure Key Vault ?
LikeLiked by 1 person
Yes you could use Azure Key Vault. AfaIk there are PowerShell cmdlets to retrieve assets from key vault?
Why I didn’t try? Well Azure Automation account does not support Managed Identity so far so you would have to authenticate against Azure Key Vault and then store “those” credentials in Azure Automation account.
But for Azure Functions I highly recommend Azure Key Vault and showed this here:
https://mmsharepoint.wordpress.com/2019/01/11/secure-azure-functions-part-2-handle-certificates-with-azure-keyvault-when-accessing-sharepoint-online/
LikeLiked by 1 person