On this personal blog I would like to share some findings, insights and stories all around my daily work as a Microsoft 365 Dev architect and consultant.
Recently I once again wrote about managed identities on Azure resources. One challenge is to assign permissions to those managed identities, especially when dealing with Microsoft Graph. As this is not possible via UI there are several options to do so. Beside my preferred way using PnP.PowerShell for this, there are other options that mostly have one disadvantage altogether: They need some prerequisites, for instance an installation.
When coming to a customer environment one cannot expect to have a host using latest PowerShell and PnP.PowerShell version or a NodeJS environment together with Microsoft365CLI. Nor the handy Microsoft Graph explorer maybe enabled because of disabled 3rd-party enterprise applications in Azure AD. Just to name a few options with prerequisites.
This post is to describe another option which should be available in any scenario where you have an Azure subscription (which is the natural prerequisite for any resource using managed identity). The usage of Azure Cloud Shell with Azure CLI and a rest request. The only other prayer was it which always needs to be fulfilled of course is an account having the correct permissions to assign permissions to managed identities. Regularly this is an Azure AD admin account.
Let’s start with that final operation which will fulfill the (role)assignment of permissions:
POST https://graph.microsoft.com/v1.0/servicePrincipals/<ID>/appRoleAssignments
{
  "principalId": "9028d19c-26a9-4809-8e3f-20ff73e2d75e",
  "resourceId": "8fce32da-1246-437b-99cd-76d1d4677bd5",
  "appRoleId": "498476ce-e0fe-48b0-b801-37ba7e2685c6"
}
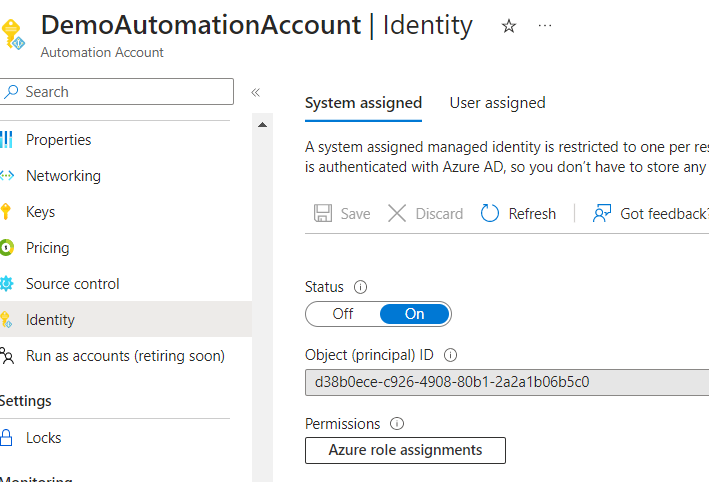
Four IDs are needed here. One occurs twice so in fact there’s a need to look up three different IDs. The Object ID of the servicePrincipal (principalID also) is the first one and this is also the ID of the Managed Identity servicePrincipal object. This can be found in two locations:
Managed Identity under Enterprise Applications in Azure AD showing Object ID and Application ID
Azure Resource (Managed) Identity Tab showing Object (or service principal) ID
As visible above the managed identity can be found under enterprise applications in Azure AD while seeking for managed identity and the name. Alternatively on the identity tab of the Azure resource the Object ID of the service principal is visible as well.
Next comes the resource ID. The resource in this case is the entity the permissions shall be given to. Here we deal with two examples. First it is Microsoft Graph and 2nd SharePoint Online. So there’s a need to find those two enterprise applications and take a look at their respective Object ID:
While the object ID depends on the current tenant the application ID is the same in every tenant. For further exercises note down both.
Office 365 SharePoint Online as Enterprise Application with Object ID and Application ID
The same can be done for Office 365 SharePoint Online. Note down the object ID and the application ID.
Last not least there is the appRoleId. This depends on the resource above. So above gathered IDs must be used to identify the appRoleId. Let’s assume the Graph permission Calendars.Read shall be given. The following Azure CLI command will request it:
az ad sp show --id 00000003-0000-0000-c000-000000000000 --query "appRoles[?value=='Calendars.Read'].[value, id]"

[
  [
    "Calendars.Read",
    "798ee544-9d2d-430c-a058-570e29e34338"
  ]
]
The command first retrieves the service principal with the Application ID (of Microsoft Graph). But with the query it only extracts the appRoles property while here additionally filtering the requested permission (there are many, many more!) and projects only the id and value attribute. The id shown (the same on any tenant for that permission btw) is the needed appRoleId. Above the (quite popular) Application ID of Microsoft Graph 00000003-0000-0000-c000-000000000000 was used. Using the tenant related Object ID instead will lead to the same result.
For SharePoint the command looks quite similar, assuming there’s a need for the Sites.ReadWrite.All permission:
az ad sp show --id 00000003-0000-0ff1-ce00-000000000000 --query "appRoles[?value=='Sites.ReadWrite.All'].[value, id]"

[
  [
    "Sites.ReadWrite.All",
    "fbcd29d2-fcca-4405-aded-518d457caae4"
  ]
]
To execute those commands easily use the Azure Cloud Shell reachable from the Azure portal:
Open Azure Cloud Shell in Azure portal
This opens a bash or PowerShell (which one doesn’t matter here) where the command(s) can be entered directly. If not the current user account shall be used an az login must be executed first (as maybe known from local environments) but only then.
Azure Cloud Shell in bash mode – Command execute and result
Good to go now for the final operation. Put the collected IDs in corresponding variables and execute a proper rest request with Azure CLI towards Microsoft Graph to finally assign the permissions:
oidForMI= # Object ID of Managed Identity
resourceIDMG= # Object ID (NOT Application ID as used in previous step) of Microsoft Graph Enterprise Application (Service Principal)
resourceIDSP=  # Object ID (NOT Application ID as used in previous step) of SharePoint Online Enterprise Application (Service Principal)
appRoleIdMG=1b620472-6534-4fe6-9df2-4680e8aa28ec # ServiceMessages.Read.All
appRoleIdSP=fbcd29d2-fcca-4405-aded-518d457caae4 # Sites.ReadWrite.All
az rest -m POST -u https://graph.microsoft.com/v1.0/servicePrincipals/$oidForMI/appRoleAssignments -b "{\"principalId\": \"$oidForMI\", \"resourceId\": \"$resourceIDMG\",\"appRoleId\": \"$appRoleIdMG\"}"
az rest -m POST -u https://graph.microsoft.com/v1.0/servicePrincipals/$oidForMI/appRoleAssignments -b "{\"principalId\": \"$oidForMI\", \"resourceId\": \"$serverSPOID\",\"appRoleId\": \"$roleguid\"}"
Once both az rest commands were successfully executed having a look at the “Enterprise Application” of the Managed Identity should result in the following application permissions to be shown:
Microsoft Graph application permissions given to a managed identity enterprise application
Finally, once again the reminder that currently for Microsoft Graph and SharePoint Online only application permissions are supported.
I hope this approach might help you in some situations while using the awesome and highly recommended concept of Managed Identities when dealing with the slightly problematic area of assigning permissions especially when you cannot
Install / Use PnP.PowerShell or other on-top PowerShell modules
Install / Use Microsoft365Cli
Are not allowed to use / authenticate a helper tool such as Graph Explorer or Postman
Need to ask an Azure AD Admin (where you have no influence on the host environment) to execute something on your request
Markus is a SharePoint architect and technical consultant with focus on latest technology stack in Microsoft 365 Development. He loves SharePoint Framework but also has a passion for Microsoft Graph and Teams Development. He works for Avanade as an expert for Microsoft 365 Dev and is based in Munich. In 2021 he received his first Microsoft MVP award in M365 Development for his continuous community contributions. Although if partially inspired by his daily work opinions are always personal.
In the past I already wrote about Modern Authentication in Azure Automation using an app registration with certificate to overcome disabled legacy authentication. At that point of time Azure Automation Accounts didn’t provide the capability of managed identities which were already available for other Azure resources. Meanwhile managed identities are available and even left preview status while on the other hand the old concept off run-as accounts will be deprecated very soon.
While there are pros and cons on both approaches (“Modern authentication” vs Managed Identity) which will be discussed at the end, this post shall introduce the authentication within an Azure Automation runbook using PnP.PowerShell and managed identity to access SharePoint and Microsoft Graph.
At first the given Azure Automation account needs to be enabled for managed identities. Newly created accounts should enable this by default but in older ones it might still need to be enabled.
Ensure Managed Identity is enabled on the Azure Automation Account
Next, the installed PnP.PowerShell version and module is relevant. Newer PnP.PowerShell (relevant for Managed Identity) needs PowerShell version 7.2 as runtime. I recommend to download the latest PnP version from the gallery and select the correct runtime:
Check/Install PnP.PowerShell module on correct runtime in Azure Automation Account
API permissions
Now the managed identity needs to be granted the correct permissions. This sample case uses SharePoint on the one hand and Microsoft Graph on the other hand. Please consider that we are talking about a system assigned managed identity which currently only supports application permissions. That means permissions are granted for ALL sites in your tenant. Resource specific consent might be considered as an alternative here. More to come on this later in 2023 hopefully.
Unfortunately permissions cannot be given to managed identities via the Azure AD portal in the UI. Luckily, there is as simple PnP.PowerShell cmdlet for this. The following small PowerShell script illustrates how the two necessary permissions in this use case can be given:
Connect-PnPOnline -Interactive -Url https://yourTenant.sharepoint.com/
# Use either app id or Account Name (see screenshot above) as Principal
Add-PnPAzureADServicePrincipalAppRole -Principal "DemoAutomationAccount" -AppRole "ServiceMessage.Read.All" -BuiltInType MicrosoftGraph
Add-PnPAzureADServicePrincipalAppRole -Principal "DemoAutomationAccount" -AppRole "Sites.ReadWrite.All" -BuiltInType SharePointOnline
The SharePoint URL is only needed for syntax reasons not for real functionality, while as principal you can either use their given managed identity app ID or its name which should be the same than the Azure Automation account. It’s essential to note that an Azure AD admin account is needed to perform this operations.
Runbook code
Having that setup, it’s time to create the runbook.
Create Azure PowerShell runbook on PS runtime 7.2
It’s important to pick PS runtime version 7.2 (preview) again to get support for a recent PnP.PowerShell version which supports authentication with managed identity.
The first interesting part it’s the Connect-PnPOnline. It uses ManagedIdentity and the $siteUrl given as parameter. Now any kind of SharePoint operation with PnP.PowerShell and matching the given permission can be executed. Here it’s only a simple Get-PnPWeb.
For Microsoft Graph operations, especially those executed with native Rest request, first the access token needs to be extracted and then an authorization header needs to be constructed. Then Invoke-RestMethod can be run and the result can be handled.
Summary
This sample case is retrieving properties of a given site/web and the latest 10 messages of your tenant admin center via Microsoft Graph using managed identity and PnP.PowerShell for authentication. A test result might look like the following:
Azure Automation Runbook – Test Pane result
With the current version of Azure Automation, PowerShell and PnP.PowerShell it’s relatively easy to setup authentication with managed identity. Only the permissions could be set more comfortable.
That is the case when you use your own app registration together with a certificate. This could also be reused by several automation accounts while you would need to handle each with a separate managed identity. On the other hand this could be a benefit when different permissions might be needed to better achieve least-privilege-principle.
Managed identities don’t need secret or certification lifecycle management as an advantage while they don’t support multi-tenant scenarios.
As a conclusion I would prefer managed identities except when a scenario needs to support multi-tenant or many automation accounts with similar permissions.
Markus is a SharePoint architect and technical consultant with focus on latest technology stack in Microsoft 365 Development. He loves SharePoint Framework but also has a passion for Microsoft Graph and Teams Development. He works for Avanade as an expert for Microsoft 365 Dev and is based in Munich. In 2021 he received his first Microsoft MVP award in M365 Development for his continuous community contributions. Although if partially inspired by his daily work opinions are always personal.
Most of all applications need some configuration values. Once you want to offer the option to the user to configure those values (in self service) you do not only need a UI for that but you also need to decide where to store those values. Against Microsoft SharePoint and it’s property bag for instance there is no real out-of-the-box option to store those values in Microsoft Teams applications. Okay, you might insist that if there is a Team there also is a SharePoint. But outside a native SharePoint environment (such as SharePoint Framework) access is not that easy.
First, a new Visual Studio Teams Solution needs to be created. Therefore, Visual studio 2022 in the version 17.3 or above should be installed. This enables to install Teams Toolkit in GA version. A new Teams Application with the Application Type “Message Extension” shall be created:
Create new Teams Application – Message Extension
Inside the created solution the manifest.template.json directly should be adjusted. From the composeExtensions remove every command except the type: "query" one. Also add "canUpdateConfiguration": true so the Messaging Extension becomes configurable.
Creating an Azure App Configuration is quite simple:
Create Azure App Configuration
Beside the typical Azure Attributes, such as Subscription, Resource Group or Location only a name and a Pricing Tier is needed. Especially for Development Environments interesting: There is one free resource available, where you can put your stuff in. But then it’s essential to have proper naming conventions for your keys. For productional or even enterprise scenarios I clealy do not recommend this as App A for sure does NOT need access to config of App B.
As proper naming convention was already mentioned, on the Configuration Explorer the Key/Value entries can be entered.
Azure App Configuration – Key/Value entries
One entry needs specific notice. that is the Sentinel:
Create Azure App Configuration – Key/Value entry
This value will be used later (see below) to act as a “trigger” for dynamic refresh. Only when this value is changed (simply incremented) the consuming app will refresh its configuration.
Last not least a connectionString is needed. This can be copied from the Primary Access Key Connection string:
Currently Teams Toolkit for Visual Studio does neither offer to add additional capabilities / application types (A Tab to an existing Bot or Messaging Extension solution for instance) nor does it add UI components (static HTML pages or Blazor components) although they are needed in a configurable (and also action-based) Message Extension. So this needs to be added manually.
Program.cs
In the Program.cs the following lines need to be added, so staticFiles and Blazor components can be requested / routed:
Next four basic files for Blazor component routing are needed.
3 basic Blazor files in solution explorer
An App.razor establishing basic routing:
<Router AppAssembly="@typeof(Program).Assembly">
    <Found Context="routeData">
        <RouteView RouteData="@routeData" DefaultLayout="@typeof(MainLayout)" />
    </Found>
    <NotFound>
        <p>Sorry, there's nothing at this address.</p>
    </NotFound>
</Router>
Inside, a MainLayout is referenced, which is added in a “Shared” folder as MainLayout.razor
@inherits LayoutComponentBase
@Body
This could be improved further of course but let’s keep it in but simple for now. To have everything together and at hand next an _Imports.razor file is needed, collecting all the required namespaces as @usings
Foremost, here some general scripts like FluentUI, TeamsJS SDK or blazor.server.js are loaded but also a custom script is placed here (content explained later). Furthermore, the above mentioned routing App.razor component is rendered here.
Update: In a more up-to-date post I also made a more up-to-description and this post can be found here.
The configuration page
As the Message Extension was already enabled for configuration, there are only two questions left. How the page is requested and how it is rendered.
The first one happens inside the TeamsActivityHandler as the Message Extensions’ Bot is asked for the page, once “Settings” is clicked:
protected override Task<MessagingExtensionResponse> OnTeamsMessagingExtensionConfigurationQuerySettingUrlAsync(ITurnContext<IInvokeActivity> turnContext, MessagingExtensionQuery query, CancellationToken cancellationToken)
    {
        var response = new MessagingExtensionResponse();
        MessagingExtensionResult results = new MessagingExtensionResult
        {
            Type = "config",
            SuggestedActions = new MessagingExtensionSuggestedAction
            {
                Actions = new List<CardAction>
                {
                    new CardAction
                    {
                        Type = ActionTypes.OpenUrl,
                        Value = $"https://51df-46-128-193-33.ngrok.io/Config",
                    }
                }
            }
        };
        response.ComposeExtension = results;
        return Task.FromResult(response);
    }
As a page named Config is requested this can be created as Config.razor component:
So the component renders two <FluentTextField /> which retrieve their values from the Configuration. Additionally, a <FluentButton /> is responsible to write back the values via a JavaScript method.
So how does this work, first in the Bot (where JS sends back the settings, see next) and then with the Azure App Configuration itself.
Code – Retrieve Configuration Settings
Configuration settings are first retrieved by the Bot (after client’s Button JavaScript was executed) and so with its TeamsActivityHandler. Here simply some JSon handling takes place to extract both relevant config values and with a Helper class (see next) they are written to Azure App Configuration storage.
The sentinel finally is a trigger so the IConfiguration dynamically reloads after ALL other config values are stored. Much better than a reload would take place on any write update.
Code – Write to App Configuration
As seen above, there is a simple Helper class accessing (in this case mainly writing) Azure App Configuration. The class itself is pretty straightforward. Needs to establish a client and then write values to corresponding keys:
public class AzureHelper
{
        private readonly ConfigurationClient _client;
        public AzureHelper(IConfiguration config)
        {
            string _connectionString = config["AZURE_CONFIG_CONNECTION_STRING"];
            _client = new ConfigurationClient(_connectionString);
        }
        public void storeConfigValue(string key, string value)
        {
            _client.SetConfigurationSetting(key, value);
        }
}
A bit sensitive is the AZURE_CONFIG_CONNECTION_STRING. This includes a token, so some kind of credential information that grants access. For the moment let’s keep it simple and as is but there are better ways to store/access those kind of information (Key Vault, Managed Identity).
As there was a .SetConfigurationSetting(key, value) you might also expect a .GetConfigurationSetting(key) and you are right. But for some reasons I decided to do it different and load the configuration values from the start and pull dynamically at runtime (as the user can change the values and those should take effect immediately).
This is setup in the Program.cs
// Azure App Configuration
string connectionString = builder.Configuration.GetSection("AZURE_CONFIG_CONNECTION_STRING")?.Value;
// Load configuration from Azure App Configuration
builder.Configuration.AddAzureAppConfiguration(options =>
{
     options.Connect(connectionString)
         // Load all keys that start with `TestApp:` and have no label
         .Select("MsgExtGraphActCfg:Settings:*", LabelFilter.Null)
         // Configure to reload configuration if the registered sentinel key is modified
         .ConfigureRefresh(refreshOptions =>
             refreshOptions.Register("MsgExtGraphActCfg:Settings:Sentinel", refreshAll: true));
});
// Add Azure App Configuration middleware to the container of services.
builder.Services.AddAzureAppConfiguration();
// Add AzureAppConfigurationSettings
builder.Services.Configure<MsgextGraphSrchCfg.Models.Settings>(builder.Configuration.GetSection("MsgExtGraphActCfg:Settings"));
// Use Azure App Configuration middleware for dynamic configuration refresh.
app.UseAzureAppConfiguration();
At first, a connectionString is needed (Endpoint=…, see above or below). With that it’s connected and all values from the app’s config namespace (“MsgExtGraphActCfg:Settings:*”) are selected. Finally a “Sentinel” config value is registered for the ONLY ONE to trigger a dynamic refresh. That means on EVERY write operation this should finally occur as well. But only ONCE for a bunch of updates.
So, as in above’s Config.razor component also in the Message Extension’s Bot component the configuration values will simply be retrieved from the IConfiguration:
protected override async Task<MessagingExtensionResponse> OnTeamsMessagingExtensionQueryAsync(ITurnContext<IInvokeActivity> turnContext, MessagingExtensionQuery query, CancellationToken cancellationToken)
{
var state = query.State; // Check the state value
var tokenResponse = await GetTokenResponse(turnContext, state, cancellationToken);
if (tokenResponse == null || string.IsNullOrEmpty(tokenResponse.Token))
{
// There is no token, so the user has not signed in yet.
// Omitted here, see details in GitHub repo
}
GraphClient client = new GraphClient(tokenResponse.Token);
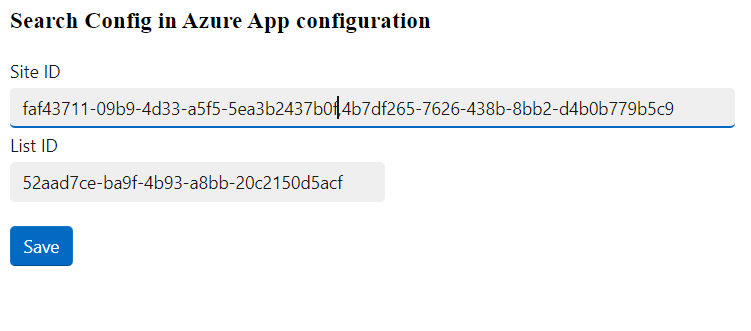
Document[] docs = await client.GetDocuments(_configuration["MsgExtGraphActCfg:Settings:SiteID"], _configuration["MsgExtGraphActCfg:Settings:ListID"]);
Managed Identity to access Azure App Configuration
As said above, dealing with sensitive credentials or similar things in normal app configuration is no good idea. So also an endpoint including a secret such as
should be kept more secure. Luckily there is a much better alternative inside Azure: Managed Identities. This should be the way to go (not only) when two Azure components access each other. In short: You can establish a Managed Identity to your App Service (hosting your application), which means provide it with an own servicePrincipal. This servicePrincipal you can then provide access to the app configuration resource and finally you do not need any secure passwords/secrets inside your code anymore. Lets do this now.
Add Managed Identity to Azure App Service of current App
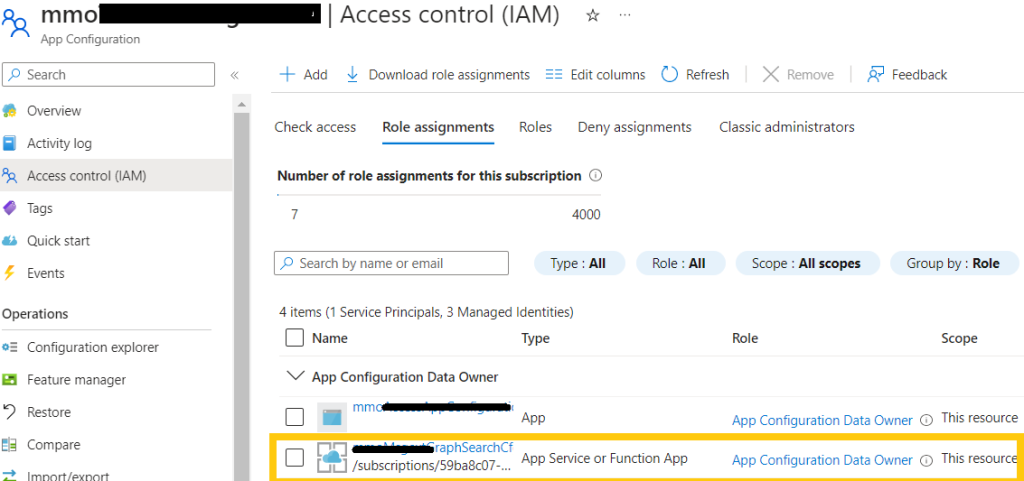
Having that, this new Identity can get access to the App Configuration:
Grant RBAC “App configuration Data Owner” to Managed Identity
It’s important to use “App configuration Data Owner” as the more limited “App configuration Data Reader” would not allow to write values.
In code now we need two changes. Those are exactly the two points where previously only the “endpoint” was used to establish a connection. As the endpoint previously included a secret no additional credentials were necessary. This is different now but to be flexible, lets decide on the configuration value what access to use.
In Program.cs it should look like this:
if (connectionString.StartsWith("Endpoint")) {
    builder.Configuration.AddAzureAppConfiguration, 4(options =>
    {
        options.Connect(connectionString)
               // Load all keys that start with `TestApp:` and have no label
               .Select("MsgExtGraphActCfg:Settings:*", LabelFilter.Null)
               // Configure to reload configuration if the registered sentinel key is modified
               .ConfigureRefresh(refreshOptions =>
                    refreshOptions.Register("MsgExtGraphActCfg:Settings:Sentinel", refreshAll: true));
    });
}
else
{
    builder.Configuration.AddAzureAppConfiguration(options =>
    {
        options.Connect(new Uri(connectionString), new ManagedIdentityCredential())
               // Load all keys that start with `TestApp:` and have no label
               .Select("MsgExtGraphActCfg:Settings:*", LabelFilter.Null)
               // Configure to reload configuration if the registered sentinel key is modified
               .ConfigureRefresh(refreshOptions =>
                    refreshOptions.Register("MsgExtGraphActCfg:Settings:Sentinel", refreshAll: true));
    });
}
At first if the config value starts with “Endpoint” its obvious there is one with a secret and the connection can be established as already known (see above). Otherwise there will be (needed) a simple https:// endpoint such as
https://MyConfigStore.azconfig.io
to the App Configuration resource and additionally a ManagedIdentityCredential is provided. For the ManagedIdentityCredential another nuget package, the Azure.Identity, is needed.
And in the AzureHelper.cs class it looks like this:
public AzureHelper(IConfiguration config)
        {
            string _connectionString = config["AZURE_CONFIG_CONNECTION_STRING"];
            if (_connectionString.StartsWith("Endpoint"))
            {
                _client = new ConfigurationClient(_connectionString);
            }
            else
            {
                _client = new ConfigurationClient(new Uri(_connectionString), new ManagedIdentityCredential());
            }
}
The rest of the solution is the standard behavior of a search-based Message Extension in Teams. The documents retrieved from the given (configured by SiteID and ListID) list are returned and once one is selected, it’s inserted in the compose box of the current conversation. Details on SSO I explained in the past for a similar solution in NodeJS and might follow here for a Teams Toolkit solution with Visual Studio soon.
Markus is a SharePoint architect and technical consultant with focus on latest technology stack in Microsoft 365 Development. He loves SharePoint Framework but also has a passion for Microsoft Graph and Teams Development. He works for Avanade as an expert for Microsoft 365 Dev and is based in Munich. In 2021 he received his first Microsoft MVP award in M365 Development for his continuous community contributions. Although if partially inspired by his daily work opinions are always personal.
This is the first post of a little series on secure Azure Functions working with Office 365. This first one is about “simple” credential (user/password or ID/secret) access. Next we are going to use an additional certificate while accessing SharePoint Online.
Secure Azure Functions Part 1 – Use Azure KeyVault Secrets when accessing Microsoft Graph
When secure access to APIs is needed from Azure Functions the challenge is to securely store access credentials or secrets. To access Microsoft Graph for instance for the OAuth authentication you need a ClientID and a secret. The question is now where to store this. Is it a good idea to store this in your code or AppSettings? Most likely not!
In this post I want to show you a simple scenario to access Microsoft Graph from an Azure function and retrieving the ClientID and AppSecret from Azure KeyVault.
Accessing Microsoft Graph in this case is only an example for an API access where a secret is needed.
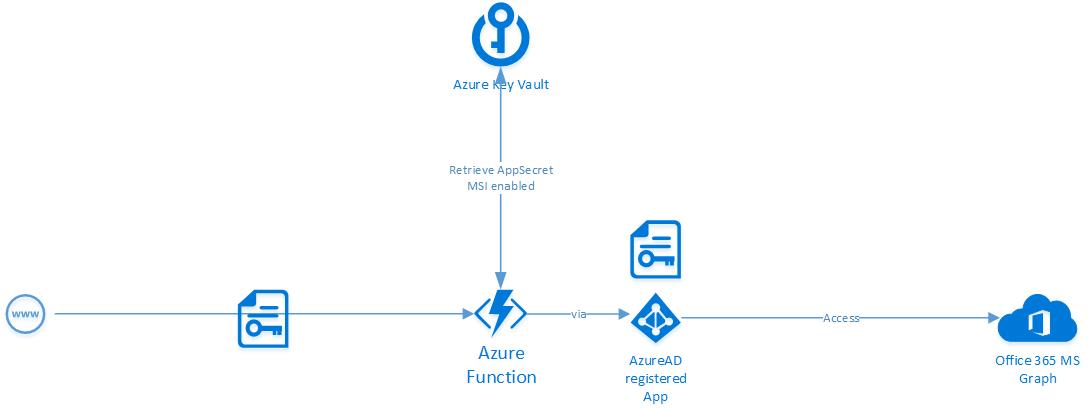
The architecture scenario
Our architectural scenario is an Azure function that is securely called, for instance from a SharePoint Framework (SPFx) component via the new AADHttpClient. Nevertheless we will omit the UI part in this post and fully concentrate on the backend side:
So there we have our Azure function which will securely retrieve access credentials from Azure Key vault. Having that it will securely authenticate against our backend Api, that is Microsoft Graph in our example.
At first we will start creating the “credentials” for our backend Api. In our case this is an Azure Active Directory app registration.
App registration to access Microsoft Graph
There are two versions for Azure App registrations. V1 and V2. For a detailed overview on the differences refer to here. But as we want to access Microsoft Graph and this is possible with V2 we will now use that one. In a later scenario we will access SharePoint Online which was only possible till recent past with V1 and then we will have a look at that variant.
Copy the application Id (we can do this later as well)
Create a new secret and copy it (Attention, we CAN’T do this later as well, we only can create a new one if we forget)
Add the platform Web-Api
As we want to access Office 365 Groups and its owners:Add Application permission Group.Read.All and Directory.Read.All
You can uncheck Live SDK support
To manage V2 app registrations from Azure Portal as well is currently under preview at the time of writing (end of 2018). To use it, simply log in to https://portal.azure.com/, go to "Azure Active Directory" and then "App registrations (preview)". The steps then are quite the same then mentioned above but slightly simpler. We will have a look at this in a later scenario as through this way it is now also possible to handle SharePoint Online Api permissions.
Once you have registered your app you need to consent it. Use the following Url template:
The tenant can be your GUID our the full name ( .onmicrosoft.com ).
The redirect_uri is obsolete as it might not be reached after everything went fine so ignore the 404 error afterwards.
In the new app registration preview this step can be done directly from the app registration by one click (make sure you are logged in as tenant admin that has adequate permissions to grant them to all users).
Grant Microsoft Graph Api permissions (app registration preview)
Establish Azure KeyVault
Creating an Azure KeyVault is also straightforward with some small but important steps to notice. First we switch to “Key vaults” in the Azure portal and create a new one:
A unique name is necessary as well as the subscription and the ressource group. The rest we can keep as is for now.
Next we will add our created AppID and Secret to the Key vault:
We do this twice. Once for the ID (debatable, you might also put this only to the AppSettings but …) and once for the Secret (not debatable 😉 )
Before leaving the key vault for a moment we might note down it’s Url which we need for access from our code later:
That’s it for the moment. Once we are going to retrieve them from our Azure function we will come back to establish access to the key vault.
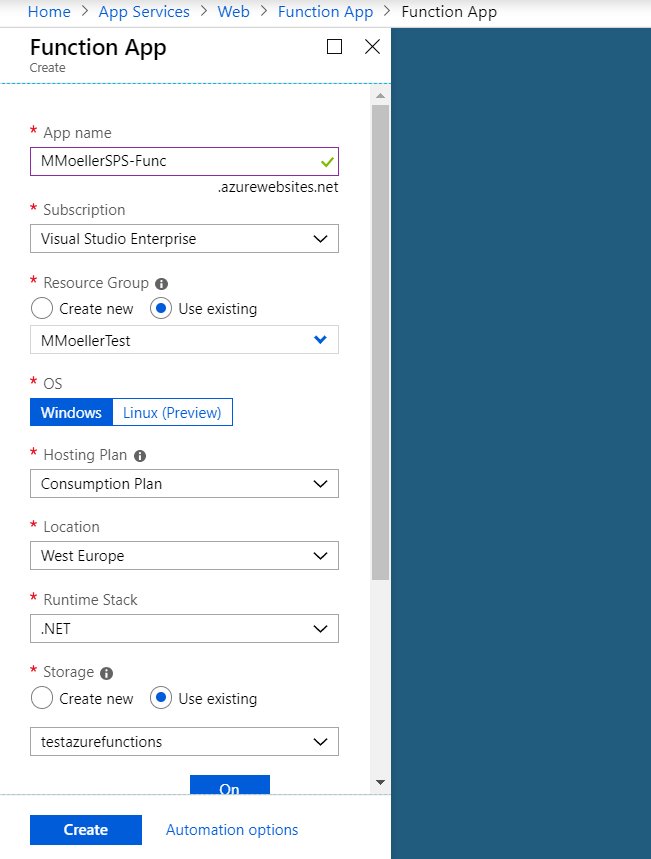
Configure the Azure Function App
For the Azure Function App we basically don’t need something special. For those of you new to the topic pay attention to create the Function App via “App Services”:
Additionally (for instance when consuming your Azure function from SharePoint Framework (SPFx)) you might need tp
For sure the access to the recently established Azure key vault is not “anonymous” but also secured. The trick to not having to handle another credential/secret is the “Managed Service Identity”.
We can simply extend our Azure function app to register with Active Directory. In a next step we allow access for that AAD registration (think of an AD account for that app which auto-authenticates against the key vault later on) to our Azure key vault.
In your function app select “Platform settings” and there “Managed Service Identity”
Next you simply turn MSI on and save it
That’s it. After a short while you can switch back to your Azure key vault. There you choose “Access policies” and “+ Add new”.
Under “Principal” search for the recently created app function name. It can be easily detected by the special icon logo. For permissions select “Get” and “List” at least for “Secret Permissions” (for a later scenario I already added the same for key and certificate…)
Example Code
Retrieve Key Vault Secret
The first thing we need are our app credentials (ID / secret) to access Microsoft Graph afterwards. The retrieval is quite simple as we need no explicit authentication. It is handled implicitly by MSI.
This file contains bidirectional Unicode text that may be interpreted or compiled differently than what appears below. To review, open the file in an editor that reveals hidden Unicode characters. Learn more about bidirectional Unicode characters
The async task will return the secret for a given name. First we build the Uri for it, constructed by our base Url we noted above when establishisng our key vault and now retrieving it from the ConfigurationManager. The Url is something like:
https://<Your-Key-Vault-Name>.vault.azure.net
Then with that Uri we finally retrieve the secretValue asynchronously and return it back.
Access Microsoft Graph
To access Microsoft Graph we use the MSAL library which is represented by the NuGet package “Microsoft.Identity.Client”. This library is designed to handle Azure AD V2 endpoint access with AccessTokens. It is still a pre-release as time of writing (end of 2018) but it is declared “production ready”. You could also use the ADAL library for this scenario (you find an alternative example in the source code) and will use this in a later scenario for V1 access. Further explanation you can find here.
This file contains bidirectional Unicode text that may be interpreted or compiled differently than what appears below. To review, open the file in an editor that reveals hidden Unicode characters. Learn more about bidirectional Unicode characters
We extract our Graph stuff to a separate controller. At first we need some basic values which we can either hardcode or retrieve from ConfigurationManager.
But on top we need our registered values from above which we included both in Azure KeyVault. We will provide them within our constructor.
Next thing is to establish a GraphServiceClient. Therefore we retrieve an AccessToken via MSAL and on behalf of our client app registration values.
Finally we have our Task to retrieve the data. In our small example case we want to check if a given user account is owner of a given Office365 Group ID.
The Azure Function – Putting it all together
The magic is already shown but now we simply put it alltogther inside our Azure function.
This file contains bidirectional Unicode text that may be interpreted or compiled differently than what appears below. To review, open the file in an editor that reveals hidden Unicode characters. Learn more about bidirectional Unicode characters
For our simple demo scenario we expect an Office 365 GroupID and a user login from query parameters.
Next we retrieve our application ID and our application secret from Azure Key vault by using our static KeyVaultAccess class.
Having those values we instantiate our GraphAccess class.
Once we have it we finally call the isValid method to evaluate if the given login is owner of the given group. The method retrieves the login and group id but before it needs a “GraphServiceClient”. I showed you two methods (ADAL and MSAL version) inside the GraphAccess class and here the MSAL version is called. That’s it.
Conclusion
You could now call this function from a SPFx solution for instance but might also say: Hey, why not directly call the Graph from SPFx?
You are right but this is an example that can be simply adapted to your own API call (that is, not MSGraph but also needs a ID/Secret or user/password access). Furthermore you might not provide a privileged access to your users by admit WebApiPermissions. Or you need Graph access in combination with other backend code for instance?
An even better scenario for this is elevating SharePoint permissions. Therefore I am going to write another post establishing access to SharePoint Online from Azure function by using Azure Key vault. Here we will need a certificate on top. So stay tuned.