Tag: SSO

PDF document conversion in a Teams Tab with Microsoft Graph and Teams Toolkit for Visual Studio (C#)

PDF document conversion in a Teams Tab with Microsoft Graph and Teams Toolkit for Visual Studio (C#)

Recently I started to create Microsoft Teams App samples with the Teams Toolkit and Visual Studio using C# as backend programming language for instance. Here is my second rebuilt sample, a PDF conversion on Drag&Drop upload in a Teams Tab.

Content

Setup

First you need to setup your Teams application. You should have Visual studio 2022 in the version 17.3 or above installed. This enables you to install Teams Toolkit in GA version. Then a Teams App, here a Tab, can be created. This was already described in my last post so I won’t repeat it here again.

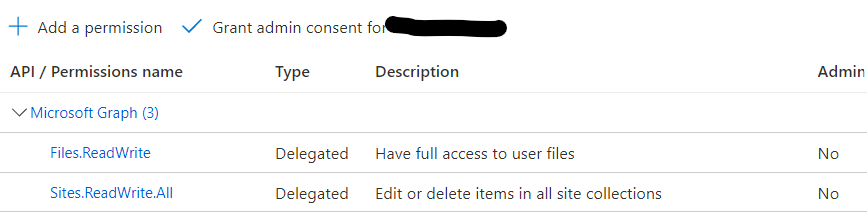
After the Teams App Dependencies were prepared a basic app registration was created for you. Next there is a need to slightly adjust permissions according to this solution.

Azure App registration

The app registration created is already pre-configured to support the Teams SSO process. The following steps can already be found after “Prepare Teams App Dependencies” (see above):

  • A redirect uri https://localhost/blank-auth-end.html
  • Multi-tenant enabled
  • A client secret
  • An exposed Api “access_as_user” and App ID Uri api://localhost/
  • With the client IDs for Teams App and Teams Web App 1fec8e78-bce4-4aaf-ab1b-5451cc387264 and 5e3ce6c0-2b1f-4285-8d4b-75ee78787346

Additionally for the upload and download operations ReadWrite permissions to OneDrive and SharePoint are needed.

Add necessary Graph delegated app permissions Files.ReadWrite and Sites.ReadWrite.All
Add necessary Graph delegated app permissions

Client-Side

Drag&Drop

The drag&drop handling needs to be enabled for a specific component and also visualized by highlighting the “landing zone”. Therefore, different event receivers are set and implemented in JavaScript.

<div class="dropZone" 
          ondragenter="TabPDF.Drag.enableHighlight(event)"
          ondragleave="TabPDF.Drag.disableHighlight(event)"
          ondragover="TabPDF.Drag.allowDrop(event)"
          ondrop="TabPDF.executeUpload(event)">
      ...
    </div>
TabPDF.Drag = {};
{
    TabPDF.Drag.allowDrop = function (event) {
      event.preventDefault();
      event.stopPropagation();
      event.dataTransfer.dropEffect = 'copy';
    }
    TabPDF.Drag.enableHighlight = function (event) {
      TabPDF.Drag.allowDrop(event);
      const bgDIV = document.getElementsByClassName('dropZone');
      bgDIV[0].classList.add('dropZoneHighlight');
    }
    TabPDF.Drag.disableHighlight = function (event) {
      TabPDF.Drag.allowDrop(event);
      const bgDIV = document.getElementsByClassName('dropZone');
      bgDIV[0].classList.remove('dropZoneHighlight');
    }
}

Progress Indicator

As the conversion process consists of 3 major up-/download operations and may take a while showing a progress indicator to the user is a good and polite idea. Therefore, usage of a FluentUI Blazor component is a suitable idea:

<div style="display: none;" class="loader">
    <FluentProgressRing />
</div>

This is enabled by the following <script /> tag in the root HTML page:

<script type="module" src="https://unpkg.com/@@fluentui/web-components"></script>

In the JavaScript code at the beginning of the upload operation the whole <div/> containing the progress indicator is made visible while it’s turned off again at the very end.

TabPDF.executeUpload = function (event) {
    TabPDF.Drag.allowDrop(event);
    const loaderDIV = document.getElementsByClassName('loader')[0];
    loaderDIV.style.display = 'flex';
    const dt = event.dataTransfer;
    const files = Array.prototype.slice.call(dt.files); 
    files.forEach(fileToUpload => {
      const extensions = fileToUpload.name.split('.');
      const fileExtension = extensions[extensions.length - 1];
      TabPDF.Drag.disableHighlight(event);
      if (TabPDF.Utilities.isFileTypeSupported(fileExtension, 'PDF')) {
        const formData = new FormData();
        formData.append('file', fileToUpload);
        formData.append('Name', fileToUpload.name);
        formData.append('SiteUrl', TabPDF.siteUrl);
        fetch("/api/Upload", {
          method: "post",
          headers: {
            "Authorization": "Bearer " + TabPDF.ssoToken
          },
          body: formData
        })
        .then((response) => {
          response.text().then(resp => {
            TabPDF.addConvertedFile(resp);
            loaderDIV.style.display = 'none';
          });
        });
      }
      else {
        alert('File type not supported!')
      }
    });
}

In between the file and several parameters are collected in a form and with it the backend is called. Authentication is done with a bootstrap token (generation see next).

SSO

(function (TabPDF) {
  ssoToken = "";
  siteUrl = "";
  TabPDF.getSSOToken = function () {
    if (microsoftTeams) {
      microsoftTeams.initialize();
      microsoftTeams.authentication.getAuthToken({
        successCallback: (token, event) => {
          TabPDF.ssoToken = token;
        },
        failureCallback: (error) => {
          renderError(error);
        }
      });
    }
  }
}
}(window.TabPDF = window.TabPDF || {}));

This is a self invoking function that stores itself in a global variable. The TabPDF.getSSOToken function is executed onload of the whole script

<script onload="(function () { TabPDF.getSSOToken(); TabPDF.getContext();}).call(this)" src="/js/TabPDF.js">

The function uses the TeamsJS SDK 2.0 to get an AuthToken. That is, the so called ID or bootstrap token which needs to be exchanged to an access token for getting access to Microsoft Graph. But this happens later server-side. For the moment it is stored in a class variable where it’s taken from “on action” when a file is dropped.

Additionally TeamsJS SDK 2.0 provides either the SharePoint siteUrl for the current Teams’ site (if Tab is running as a Configurable inside a team) or the SharePoint host url (if Tab is running as static or personal one). That siteUrl will later be used as the target siteUrl for final upload of the converted PDF.

TabPDF.getContext = function () {
    if (microsoftTeams) {
      microsoftTeams.app.getContext()
        .then(context => {
          if (context.sharePointSite.teamSiteUrl !== "") {
            TabPDF.siteUrl = context.sharePointSite.teamSiteUrl;
          }
          else {
            TabPDF.siteUrl = "https://" + context.sharePointSite.teamSiteDomain;
          }
        });
    }
  }

Alternatively, a dedicated site url could be stored with the configuration option. This is another story and for Teams Toolkit and Visual Studio I will handle later.

Backend Graph Controller

Authentication / SSO

In the call above the bootstrap token was used for authentication with “Bearer “. Any backend controller in our solution now simply gets added UI authentication and additionally a Microsoft Graph client established by automatic use of the on-behalf flow. This is done in the program.cs

builder.Services
    // Use Web API authentication (default JWT bearer token scheme)
    .AddMicrosoftIdentityWebApiAuthentication(builder.Configuration)
    // Enable token acquisition via on-behalf-of flow
    .EnableTokenAcquisitionToCallDownstreamApi()
    // Add authenticated Graph client via dependency injection
    .AddMicrosoftGraph(builder.Configuration.GetSection("Graph"))
    // Use in-memory token cache
    // See https://github.com/AzureAD/microsoft-identity-web/wiki/token-cache-serialization
    .AddInMemoryTokenCaches();

Token acquisition 8not needed here, but…) but also the Microsoft Graph SDK client they can then directly be used inside our controller:

[Route("api/[controller]")]
[ApiController]
public class UploadController : ControllerBase
{
    private readonly GraphServiceClient _graphClient;
    private readonly ITokenAcquisition _tokenAcquisition;
    private readonly ILogger<UploadController> _logger;
    public UploadController(ITokenAcquisition tokenAcquisition, GraphServiceClient graphClient, ILogger<UploadController> logger)
    {
        _tokenAcquisition = tokenAcquisition;
        _graphClient = graphClient;
        _logger = logger;
    }
...

Temporary upload to OneDrive

The backend operation first takes the file and the other parameters, and uploads the file directly to OneDrive for a temporary purpos.

public async Task<ActionResult<string>> Post([FromForm] UploadRequest fileUpload)
{
    string userID = User.GetObjectId(); 
    DriveItem uploadResult = await this._graphClient.Users[userID]
                                            .Drive.Root
                                            .ItemWithPath(fileUpload.file.FileName)
                                            .Content.Request()
                                            .PutAsync<DriveItem>(fileUpload.file.OpenReadStream());

Download with PDF conversion

Having a file uploaded to OneDrive, and received the driveItemID, it is quite simple to download it once again, but this time with the format conversion to PDF. Therefore, “?format=PDF” is attached to the request, here with the Microsoft Graph SDK as QueryOption

private async Task<Stream> GetPDF(string userID, string itemID)
{
    var queryOptions = new List<QueryOption>()
    {
        new QueryOption("format", "PDF")
    };
    Stream pdfResult = await this._graphClient.Users[userID]
                                            .Drive.Items[itemID]
                                            .Content
                                            .Request(queryOptions)
                                            .GetAsync();
    return pdfResult;
}

Final upload to target

Finally, the PDF converted Stream needs to be uploaded to the target siteUrl (definition depending on current context, see above). First, a new pdfFileName needs to be constructed by exchanging former file extension with .pdf

The upload itself is easy (omitting UploadSession and big file sizes here). After evaluating the siteId based on the given siteUrl the upload itself can be executed and the webUrl of the new DriveItem can be returned for display.

private async Task<string> UploadPDF(string userID, string orgFileName, Stream fileStream, string siteUrl)
{
    string pdfFileName = Path.GetFileNameWithoutExtension(orgFileName);
    pdfFileName += ".pdf";
    string siteId = await EvaluateSiteID(siteUrl);
    DriveItem uploadResult = await this._graphClient.Sites[siteId]
                                                    .Drive.Root
                                                    .ItemWithPath(pdfFileName)
                                                    .Content.Request()
                                                    .PutAsync<DriveItem>(fileStream);
    return uploadResult.WebUrl;
}
private async Task<string> EvaluateSiteID(string siteUrl)
{
    Uri siteUri = new Uri(siteUrl);
    Site site = await this._graphClient.Sites.GetByPath(siteUri.PathAndQuery, siteUri.Host).Request().GetAsync();
    return site.Id;
}

Delete temporary file

Finally to clean up resources the temporary first upload file to OneDrive can be deleted. That’s quite easy because we still have the driveItem ID.

private async Task DeleteTempFile(string userID, string itemID)
{
       await this._graphClient.Users[userID]
                    .Drive.Items[itemID]
                    .Request()
                    .DeleteAsync();
}

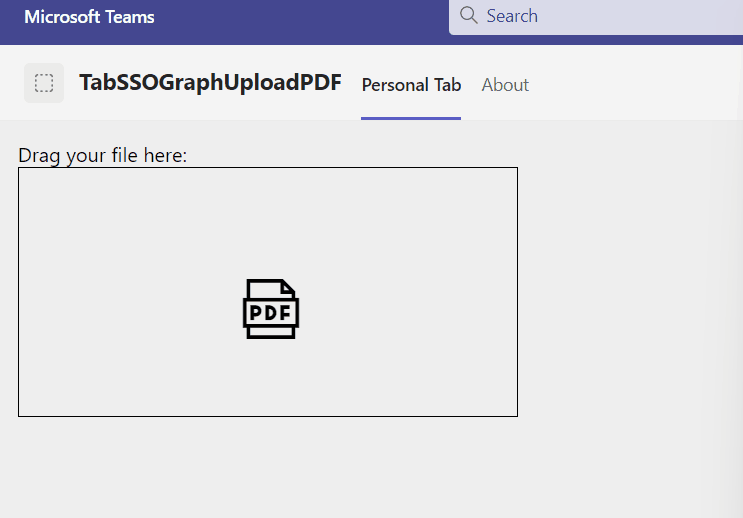
Finally, the app in action looks like the following:

 The whole upload and PDF conversion process running​
The whole upload and PDF conversion process running

I hope I explained the essential topics drag&drop in HTML5, Teams SSO, Microsoft Graph file upload and PDF conversion in an understandable way. Also, you understood once again, the benefit of such a backend solution, when having the need for a chain of upload and download operations. In SPFx I once upon a time realized a similar solution, but that is not the best idea. Nevertheless for your reference, the whole solution is available in my GitHub repository.

Markus is a SharePoint architect and technical consultant with focus on latest technology stack in Microsoft 365 Development. He loves SharePoint Framework but also has a passion for Microsoft Graph and Teams Development.
He works for Avanade as an expert for Microsoft 365 Dev and is based in Munich.
In 2021 he received his first Microsoft MVP award in M365 Development for his continuous community contributions.
Although if partially inspired by his daily work opinions are always personal.
A SharePoint document generator as Microsoft 365 app I (yoteams)

A SharePoint document generator as Microsoft 365 app I (yoteams)

Recently I already wrote about Microsoft 365 across applications that can be run in either Teams, Office (Microsoft 365) or Outlook. Since version 1.16 now it is also possible to develop and host those applications in SharePoint with SharePoint Framework (SPFx). So let’s dive into another sample application and see how this can be realized with either a Teams dev application, or based on SharePoint Framework (SPFx). Let’s start here with the native teams alternative.

Series

Content

Setup

At first a solution needs to be scaffolded with the yeoman generator for Teams as one option:

Generate a personal tab and search-based messaging extension with yo teams

It is important to use the generator version 4 or above which includes TeamsJS SDK version 2, and to select a manifest version 1.13 or above. We pick a personal tab as base application, and the search-based messaging extension for a later scenario. Only those types can currently be used across different Microsoft 365 products.

SharePoint content type

In a previous post, I already explained how to create a SharePoint content type either manually or in an automatic way. Here we want to use exactly this content type. So for details refer to the other post, but what’s essential is the placement of a custom document template inside the hidden _cts folder.

SSO for SharePoint Rest API

I already wrote about generating an SSO token for SharePoint Rest API in Teams applications. But there I needed a token on top and not exclusively. So here we are not using a refresh token, but simply the standard on-behalf-of flow.

const tokenResult = await exchangeForToken(teamSiteDomain.toLowerCase().replace('sharepoint', 'onmicrosoft'),
            req.header("Authorization")!.replace("Bearer ", "") as string,
            `https://${teamSiteDomain}/AllSites.Write`);
...
const exchangeForToken = (tenantName: string, token: string, scope: string): Promise<{accessToken: string}> => {
    return new Promise((resolve, reject) => {
      const url = `https://login.microsoftonline.com/${tenantName}/oauth2/v2.0/token`;
      const params = {
        client_id: process.env.TAB_APP_ID,
        client_secret: process.env.TAB_APP_SECRET,
        grant_type: "urn:ietf:params:oauth:grant-type:jwt-bearer",
        assertion: token,
        requested_token_use: "on_behalf_of",
        scope: scope
      };
      Axios.post(url,
        qs.stringify(params), {
        headers: {
            "Accept": "application/json",
            "Content-Type": "application/x-www-form-urlencoded"
        }
      }).then(result => {
        if (result.status !== 200) {
          reject(result);
        } else {
          resolve({accessToken: result.data.access_token});
        }
      }).catch(err => {
        // error code 400 likely means you have not done an admin consent on the app
        log(err);
        reject(err);
      });
    });
};

The preparation and implementation is very close to the generation of a graph access token described in one of my previous posts. The only difference is the scope which requests a dedicated SharePoint permission and makes the token usable for SharePoint Rest API.

I am using SharePoint Rest API here because Microsoft Graph cannot access the file template in the hidden folder, yet (using a normal document in a standard library would work of course), and the transformation to a SharePoint framework solution is much easier, too. Also, unfortunately, I currently see no option to authenticate in PnPJS with a given O-B-O access token.

Client-side components

Client-side there is the normal Tab component, which holds the functionality, and includes the Form component, which holds the UI controls. This will later also help to reproduce the same solution in SPFx.

React components for create offer in VSCode
React components for create offer process

Let’s start with the form. It uses various FluentUI Northstar components such as text and number Input fields, a Dropdown or a Textarea. All handle their values in the state and on submit Button the values are sent to the backend.

Form to create a custom offer document

From the form component a callback function coming from the parent Tab component is called and the offer object to be created consisting of all the controls’ values is handed in.

<Button onClick={storeData}>Create Offer</Button>
... 
 const storeData = useCallback(() => {
    const newOffer: IOffer = {
      title: title ? title : '',
      description: description ? description : '',
      date: date ? date : '',
      price: price ? price : 0,
      vat: vat ? vat : 0
    };
    props.createOffer(newOffer);
  }, [title, description, date, price,vat]);
const createOffer = (offer: IOffer) => {
    if (idToken) {
      setShowSpinner(true);
      const requestBody = {
        domain: context?.sharePointSite?.teamSiteDomain,
        offer: offer
      };
      Axios.post(`https://${process.env.PUBLIC_HOSTNAME}/api/createoffer`, requestBody, {
                  responseType: "json",
                  headers: {
                    Authorization: `Bearer ${idToken}`
                  }
      }).then(result => {
        if (result.data.fileUrl) {
          setOfferCreated(true);
        }     
      })
      .catch((error) => {
        console.log(error);
      })
      .finally(() => {
        setShowSpinner(false);
      });
    }
};

Teams context

Although the app is a personal tab and not running in a specific context of a team / SharePoint site, we can get an interesting detail from the context:

context.sharePointSite.teamSiteDomain

While other attributes of sharePointSite such as teamSiteId, teamSitePath or teamSiteUrl are not filled in a personal Tab without direct context of a Team / Site, teamSiteDomain still is (as this is more tenant-related) and this can be helpful. Also, information about the user’s my-site is available here.

Copy template to document

To instantiate a custom offer document programmatically, three steps, are necessary:

  1. Load the document template from the hidden folder
  2. Copy it as document to the shared documents library
  3. Set the metadata to the corresponding form controls’ values

Everything should be ready for the first SP rest API request, such as access token, site URL and namings. The first request is for a blob file in SharePoint’s and hidden _CTS site folder.

const loadTemplate = async (spoAccessToken: string, offer: IOffer, siteUrl: string, teamSiteRelativeUrl: string): Promise<any> => {
    const requestUrl: string = `${siteUrl}/_api/web/GetFileByServerRelativeUrl('${teamSiteRelativeUrl}/_cts/Offering/Offering.dotx')/OpenBinaryStream()`;
    return Axios.get(requestUrl,
      {
        responseType: 'arraybuffer', // no 'blob' as 'blob' only works in browser
        headers: {          
            Authorization: `Bearer ${spoAccessToken}`
        }
      })
      .then(response => {
        const respFile = { data: response.data, name: `${offer.title}.docx`, size: response.data.length };
        return respFile;      
      }).catch(err => {
        log(err);
      });
  };

Two things are mentionable here. The OpenBinaryStream() endpoint requesting the file addressed by name and the responseType: ‘arraybuffer’ which is necessary in backend applications outside the browser.

Having the template file as a stream, it can be uploaded as a new document to the target site’s standard document library.

const createOfferFile = async (spoAccessToken: string, siteUrl: string, teamSiteRelativeUrl: string, file: any): Promise<any> => {
    const uploadUrl = `${siteUrl}/_api/web/GetFolderByServerRelativeUrl('${teamSiteRelativeUrl}/Shared Documents')/files/add(overwrite=true,url='${file.name}')` ;
    return Axios.post(uploadUrl, file.data,
      {
        headers: {          
            Authorization: `Bearer ${spoAccessToken}`,
            "Content-Length": file.size,
            "Content-Type": "application/vnd.openxmlformats-officedocument.wordprocessingml.document"
        }
      })
      .then(response => {
        return response.data;      
      }).catch(err => {
        log(err);
      });
};

The file name is created from the offer’s metadata. Additionally, the content-type in the header of the request is important.

To finally set the metadata of the file’s list item there is a need for additional information. This can be requested with the /ListItemAllFields endpoint of the file first.

const getFileListItem = async (spoAccessToken: string, siteUrl: string, teamSiteRelativeUrl: string, fileName: string): Promise<any> => {
    const requestUrl = `${siteUrl}/_api/web/GetFileByServerRelativeUrl('${teamSiteRelativeUrl}/Shared Documents/${fileName}')/ListItemAllFields`;
    return Axios.get(requestUrl,
      {
        headers: {          
            Authorization: `Bearer ${spoAccessToken}`
        }
      })
      .then(response => {
        const itemID = response.data.ID;
        return { id: itemID, type: response.data["odata.type"] }; 
      }).catch(err => {
        log(err);
      });
};

Now, having the item ID and type it is possible to update the file’s list item with the corresponding metadata requested in the form.

const updateFileListItem = async (spoAccessToken: string, siteUrl: string, teamSiteRelativeUrl: string, itemID: string, itemType: string, offer: IOffer) => {
    const requestUrl = `${siteUrl}/_api/web/lists/GetByTitle('Documents')/items(${itemID})`;
    const requestBody = {
      "__metadata": {
          "type": itemType
      },
      "Title": offer.title,
      "OfferingDescription": offer.description,
      "OfferingVAT": offer.vat,
      "OfferingNetPrice": offer.price,
      "OfferingDate": offer.date
    };
    return Axios.post(requestUrl, requestBody,
      {
        headers: {          
            Authorization: `Bearer ${spoAccessToken}`,
            "Content-Type": "application/json;odata=verbose",
            "Accept": "application/json;odata=verbose",
            "If-Match": "*",
            "X-HTTP-Method": "MERGE"
        }
      })
      .then(response => {
        return response.data;      
      }).catch(err => {
        log(err);
      });
  };

All in all the app in action looks like this:

In this post the key parts of the solution were highlighted and illustrated. Nevertheless for your reference you can find the whole solution in my GitHub repository. I hope this sample was valuable for you. Next we gonna have a look how to achieve quite the same with the SharePoint framework. Furthermore this solution can also be extended by a search-based messaging extension to select and send such offer documents in Outlook for a review or something similar.

Markus is a SharePoint architect and technical consultant with focus on latest technology stack in Microsoft 365 Development. He loves SharePoint Framework but also has a passion for Microsoft Graph and Teams Development.
He works for Avanade as an expert for Microsoft 365 Dev and is based in Munich.
In 2021 he received his first Microsoft MVP award in M365 Development for his continuous community contributions.
Although if partially inspired by his daily work opinions are always personal.