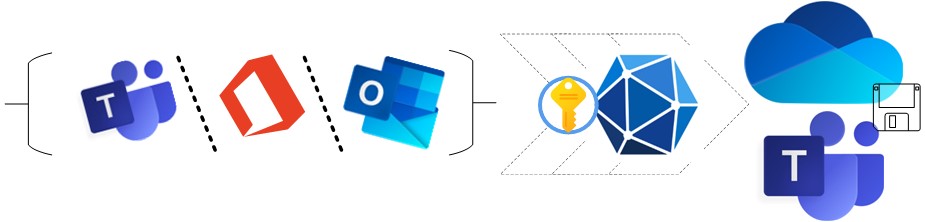
Since Teams JS SDK v 2.0 and Teams manifest v 1.13 it is possible to extend Teams applications to several M365 products. This post intends to illustrate this with a personal app running in Microsoft Teams and Microsoft Outlook or Office. It uses single-sign-on (SSO) and renders slightly different in the various M365 products.
For the sample idea I am reusing a scenario I implemented long time ago in a SPFx solution intended to act as an outlook add-in. (The underlying SPFx technology unfortunately was a stillbirth) I want to select one of user’s recent emails and store them as a whole in either OneDrive or Teams. Same thing could be implemented in a messaging extension which is also available in developer preview in Microsoft Outlook now but unfortunately only in the compose message, not in the context of a received email, yet.
As there are lots of Microsoft Graph features in it, all implemented based on single-sign-on (SSO) another focus of this article is to do it in a secure and best practice way.
Content
- Setup
- Get ID token
- Call backend (Get Emails)
- Distinct between Teams and Outlook/Office
- Simple and resumable file upload
- Use Microsoft Graph openExtensions to store custom metadata with the mail
Setup with SSO
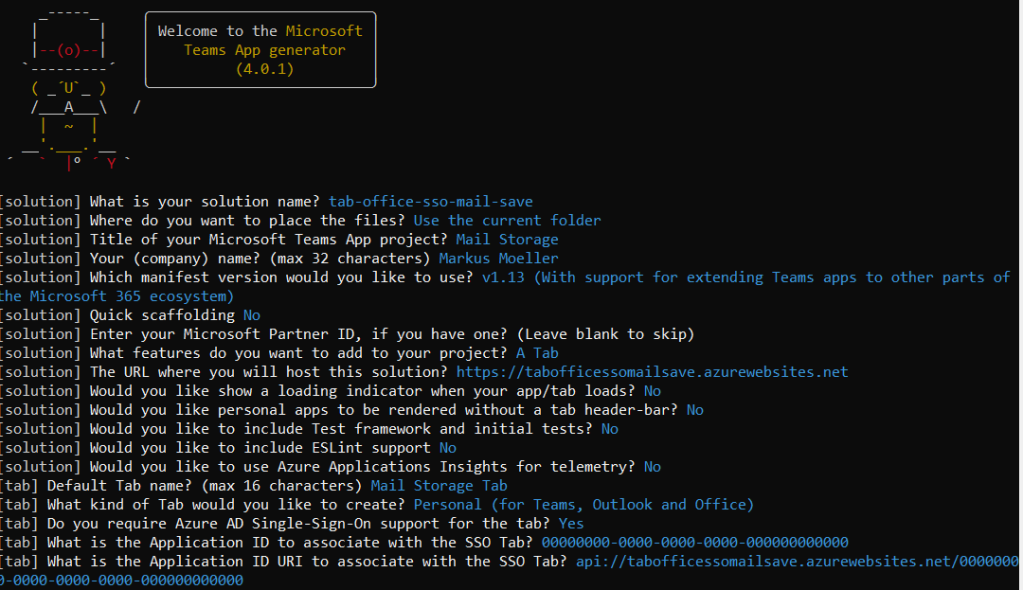
What’s needed for this scenario is a Teams personal tab application supporting single-sign-on(SSO). With the yo Teams generator it can be set up the following:
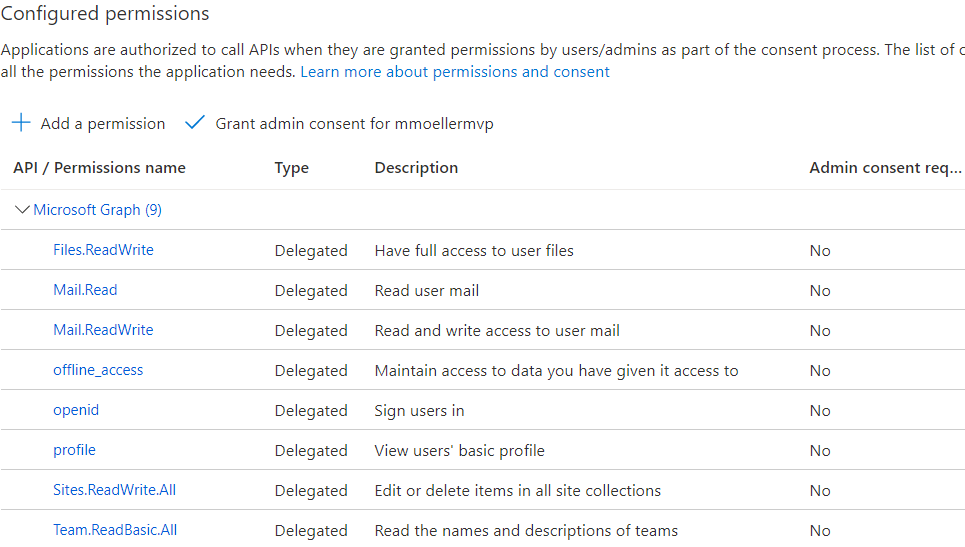
Next there is a need for an Azure AD app registration. It needs to have a client secret and the following delegated Graph API permissions:
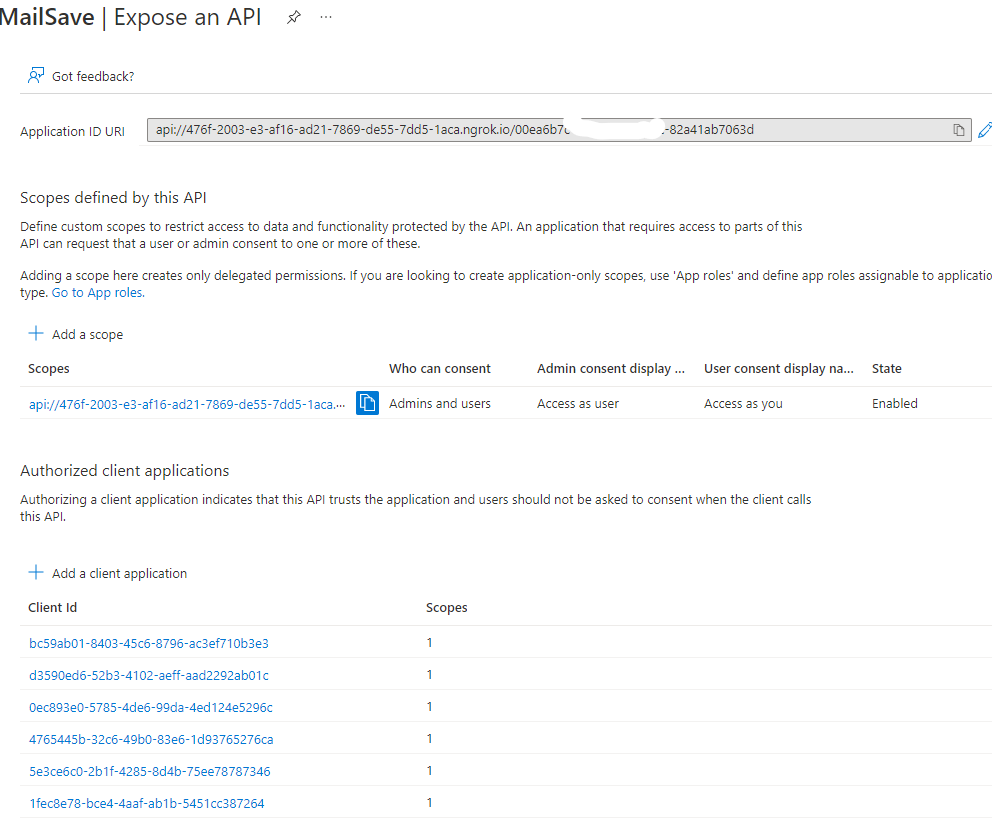
The app needs an App ID URI in the following format:
api://{{PUBLIC_HOSTNAME}}/{{TAB_APP_ID}}"
Get ID token
SSO in Microsoft Teams always starts client-side with the specific Teams JS SDK method:
if (inTeams === true) {
      authentication.getAuthToken({
          resources: [`api://${process.env.PUBLIC_HOSTNAME}/${process.env.TAB_APP_ID}`],
          silent: false
      } as authentication.AuthTokenRequestParameters).then(token => {
        getMails(token);
        setToken(token);
        app.notifySuccess();
      }).catch(message => {
          setError(message);
          app.notifyFailure({
              reason: app.FailedReason.AuthFailed,
              message
          });
      });
    }
Interestingly the inTeams state variable also works in other M365 products. Nevertheless the same code could also have been implemented in the parallel context useEffect hook. The returned token is only an ID token and put to the state but also directly used to retrieve user’s emails.
Call backend (Get Emails)
The first thing the app needs from the backend are the user’s recent emails. The only thing the client has to do here is to make one request to the backend sending over the ID token.
const getMails = async (token: string) => {
    const response = await Axios.get(`https://${process.env.PUBLIC_HOSTNAME}/api/mails`,
    { headers: { Authorization: `Bearer ${token}` }});
    setMails(response.data);
};
Server-side the request has to do three things:
- Authenticate
- Get access token with on behalf of (O-B-O) flow
- Execute Microsoft Graph request
router.get("/mails",
    pass.authenticate("oauth-bearer", { session: false }),
    async (req: any, res: express.Response, next: express.NextFunction) => {
      const user: any = req.user;
      try {
        const accessToken = await exchangeForToken(user.tid,
          req.header("Authorization")!.replace("Bearer ", "") as string,
          ["https://graph.microsoft.com/mail.read"]);
        const mails = await getMails(accessToken);
        res.json(mails);
      }
      catch (err) {
        log(err);
        if (err.status) {
            res.status(err.status).send(err.message);
        } else {
            res.status(500).send(err);
        }
      }
  });
Authentication of client request takes place in line two and could be skipped if you use an Azure function or App Service together with Microsoft Identity Provider.
Next is getting the access token with exchangeForToken
const exchangeForToken = (tid: string, token: string, scopes: string[]): Promise<string> => {
    return new Promise((resolve, reject) => {
      const url = `https://login.microsoftonline.com/${tid}/oauth2/v2.0/token`;
      const params = {
        client_id: process.env.TAB_APP_ID,
        client_secret: process.env.TAB_APP_SECRET,
        grant_type: "urn:ietf:params:oauth:grant-type:jwt-bearer",
        assertion: token,
        requested_token_use: "on_behalf_of",
        scope: scopes.join(" ")
      };
      Axios.post(url,
        qs.stringify(params), {
        headers: {
            "Accept": "application/json",
            "Content-Type": "application/x-www-form-urlencoded"
        }
      }).then(result => {
        if (result.status !== 200) {
            reject(result);
        } else {
            resolve(result.data.access_token);
        }
      }).catch(err => {
          reject(err); // error code 400 likely means you have not done an admin consent on the app
      });
    });
  };
This function is not only executed server-side but also the result, that is the access token, will only be used server-side and never be returned to the client. Secondly every time an access token is needed it will only request the currently needed permission scope although the used app registration has some more granted. In this first example it’s only https://graph.microsoft.com/mail.read
The only thing that will be returned client-side is the final result of the Microsoft Graph call which in detail is handled in the following function:
const getMails = async (accessToken: string): Promise<IMail[]> => {
    const requestUrl: string = `https://graph.microsoft.com/v1.0/me/messages?$select=id,from,subject,receivedDateTime,hasAttachments&$orderby=receivedDateTime desc`;
    const response = await Axios.get(requestUrl, {
        headers: {
            Authorization: `Bearer ${accessToken}`,
    }});
    let mails: IMail[] = [];
    response.data.value.forEach(element => {
      mails.push({
                  id: element.id,
                  from: element.from.emailAddress.name,
                  subject: element.subject,
                  hasAttachments: element.hasAttachments,
                  receivedDateTime: element.receivedDateTime });
    });
    return mails;
  };
To repeat it once again, all server operations follow the same pattern: Call the express router with the ID token for authentication, Exchange the ID token to an access token with the on behalf of flow and finally make the Microsoft Graph call using that access token only server-side. Only the resource objects as result will be returned client-side in the very end.
Distinct between Teams and Outlook/Office
To distinct between the different M365 products where the app is running in the context.app.host.name can be used.
useEffect(() => {
    if (context) {
      switch (context.app.host.name) {
        case "Teams":
          setDialogContent(<Teams getJoinedTeams={getJoinedTeams} currentFolder={currentFolder} getFolders={getFolders} mail={mails[selectedIndex!]} />);
          break;
        case "Outlook":
        default:
          setDialogContent(<OneDrive currentFolder={currentFolder} getFolders={getFolders} mail={mails[selectedIndex!]} />);
          break;
    }
  }
}, [token, currentFolder, selectedIndex]);
return (
    <Provider theme={theme}>
      <Flex fill={true} column styles={{
          padding: ".8rem 0 .8rem .5rem"
      }}>
        <Flex.Item>
          <div className="button">
          <Dialog
              cancelButton="Cancel"
              confirmButton="Save here"
              content={dialogContent}
              onConfirm={saveMail}
              header="Select storage location"
              trigger={<Button content="Save Mail" primary disabled={typeof selectedIndex === 'undefined' || (selectedIndex!<0)} />}
            />
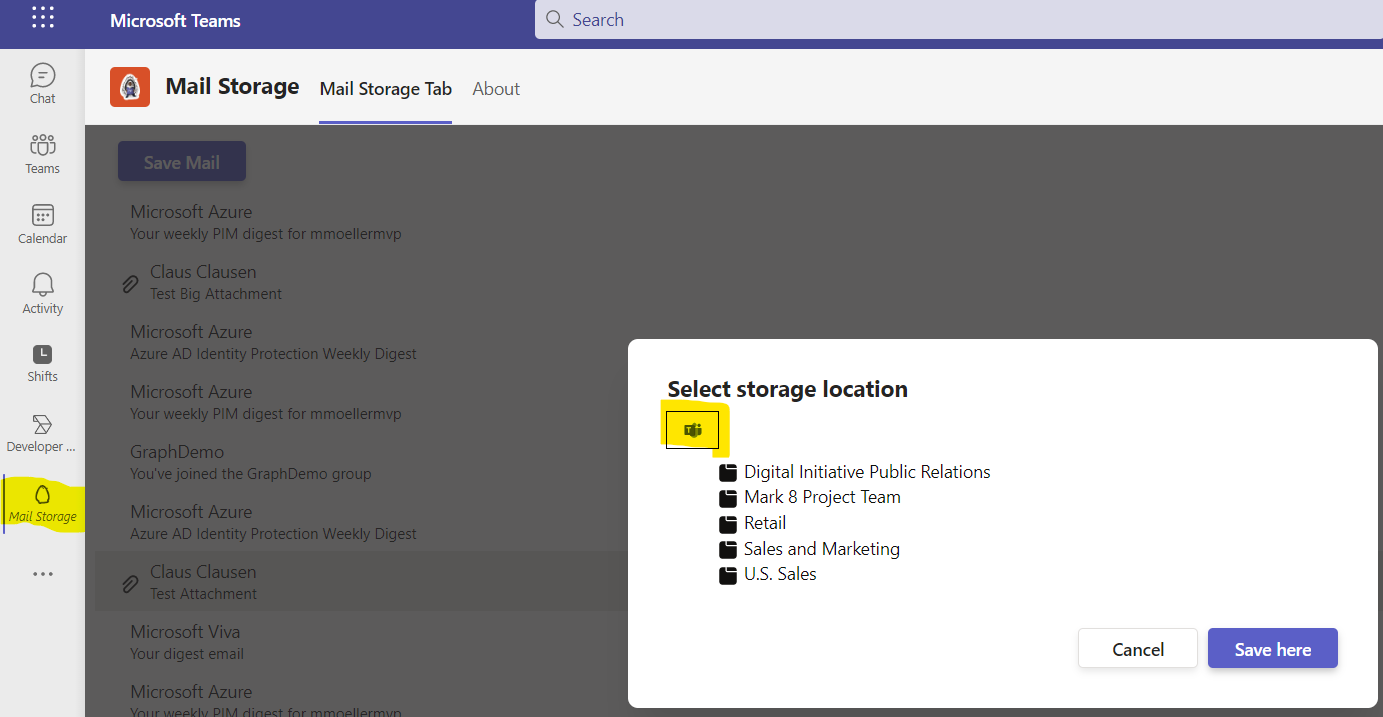
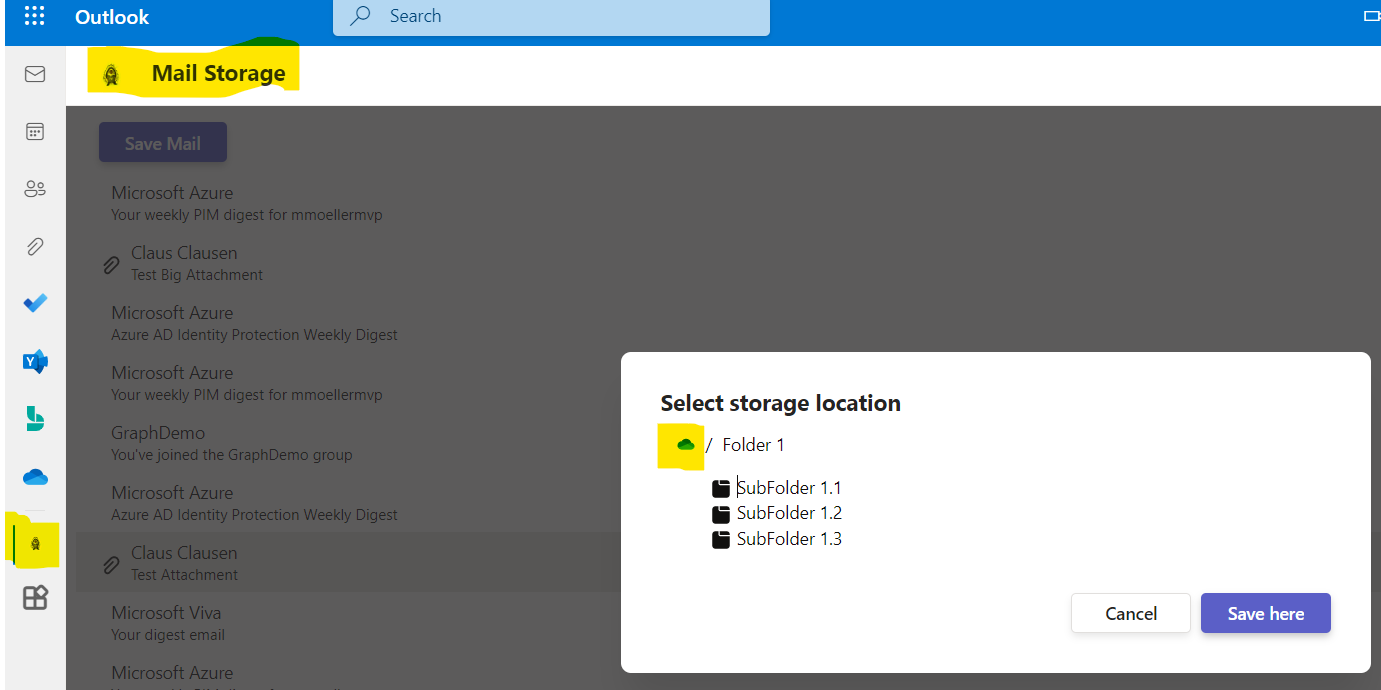
The scenario is if the app is running in Teams a dialog to select a team and its corresponding folders shall be opened. In all other cases such as Outlook or Office a dialog with personal OneDrive folders shall be opened. Depending on context.app.host.name the one or the other custom react component (<Teams /> vs <OneDrive />) is rendered inside the Dialog component.
Simple and resumable file upload
The main goals of this post as there are to extend Microsoft Teams application to other M365 products and use SSO with it were already explained. Nevertheless this sample solution got a bit more comfortable and there’s still room to explain more features. One is the file upload with Microsoft Graph. Files smaller 4MB can be uploaded with a simple PUT. But bigger files need a resumable upload session.
const saveMail = async (driveID: string, folderID: string, mailId: string, mailSubject: string, accessToken: string) => {
    const mailMIMEContent = await getMailContent(mailId, accessToken);
    const fileName = createMailFileName(mailSubject);
    let mailDriveItem: any = null;
    if (mailMIMEContent.length < (4 * 1024 * 1024)) {     // If Mail size bigger 4MB use resumable upload
      mailDriveItem = await storeMail2OneDrive(driveID, folderID, mailMIMEContent, fileName, accessToken);
    }
    else {
      mailDriveItem = await saveBigMail(driveID, folderID, mailMIMEContent, fileName, accessToken);
    }
};
This parent saveMail function first receives the MIME content of the mail and then differentiates between a size bigger or smaller 4MB. In case of bigger next a resumable upload session needs to be established with Microsoft Graph:
const saveBigMail = async (driveID: string, folderID: string, mimeStream: string, fileName: string, accessToken: string) => {
    const sessionOptions = {
      "item": {
        "@microsoft.graph.conflictBehavior": "rename"
      }
    };
    let requestUrl = `https://graph.microsoft.com/v1.0/drives/${driveID}/`;
    requestUrl += driveID !== folderID ? `items/${folderID}:/${fileName}.eml:/createUploadSession` : `root:/${fileName}.eml:/createUploadSession`;
    const response = await Axios.post(requestUrl, sessionOptions,
      {
      headers: {
          Authorization: `Bearer ${accessToken}`,
      }
    });
    const resp = await uploadMailSlices(mimeStream, response.data.uploadUrl);
    return resp.data;
};
The result is an uploadUrl against which the MIME content can be uploaded in slices.
const uploadMailSlices = async (mimeStream: string, uploadUrl: string) => {
    let minSize=0;
    let maxSize=5*327680; // 5*320kb slices --> MUST be a multiple of 320 KiB (327,680 bytes)
    while(mimeStream.length > minSize) {
      const fileSlice = mimeStream.slice(minSize, maxSize);
      const resp = await uploadMailSlice(uploadUrl, minSize, maxSize, mimeStream.length, fileSlice);
      minSize = maxSize;
      maxSize += 5*327680;
      if (maxSize > mimeStream.length) {
        maxSize = mimeStream.length;
      }
      if (resp.id !== undefined) {
        return resp;
      }
    }
};
The MIME content needs to be portioned in 320kB slices which then can be uploaded (without authorization, therefore you already have the session and uploadUrl) against the given uploadUrl.
const uploadMailSlice = async (uploadUrl: string, minSize: number, maxSize: number, totalSize: number, fileSlice: string) => {
    // Here no authorization anymore, only in createUploadSession!
    const header = {
      "Content-Length": `${maxSize - minSize}`,
      "Content-Range": `bytes ${minSize}-${maxSize-1}/${totalSize}`
    };
    const response = await Axios.put(uploadUrl, fileSlice,
    {
      headers: header
    });
    return response.data;
};
Use Microsoft Graph openExtensions to store custom metadata with the mail
To not lose overview which mail was already stored where, wouldn’t it be great to save storage information as custom metadata with each mail handled? The answer could be Microsoft Graph openExtensions (there are also schema extensions which do not really suit here which I already explained here)
After each mail storage operation the custom metadata is stored with the mail the following way:
const metadataExtensionName = "customButUnique.onmicrosoft.MailStorage";

const saveMailMetadata = async (mailId: string, displayName: string, url: string, accessToken: string) => {
    const savedDate: Date = new Date();
    const metadataBody = {
      "@odata.type" : "microsoft.graph.openTypeExtension",
      "extensionName" : metadataExtensionName,
      "saveDisplayName" : displayName,
      "saveUrl" : url,
      "savedDate" : savedDate.toISOString()
    };
    let requestUrl = `https://graph.microsoft.com/v1.0/me/messages/${mailId}/extensions`;

    const response = await Axios.post(requestUrl, metadataBody,
      {
      headers: {
          Authorization: `Bearer ${accessToken}`,
      }
    });
  };
First we need to define a custom but unique metadataExtensionName. Additionally we have the URL from the stored driveItem, a display name and the date. The rest is another Microsoft Graph operation against the extensions endpoint of the message.
While getting the emails any potential open extensions need to be retrieved by an expand as well.
requestUrl += "&$expand=Extensions($filter=id+eq+'Microsoft.OutlookServices.OpenTypeExtension.mmsharepoint.onmicrosoft.MailStorage')";
response.data.value.forEach(element => {
      mails.push({
              ...
              alreadyStored: element.extensions !== 'undefined' && element.extensions !== null && element.extensions.length > 0,
              savedUrl: element.extensions !== 'undefined' && element.extensions !== null && element.extensions.length > 0 ? element.extensions[0].saveUrl : "",
              savedDisplayName: element.extensions !== 'undefined' && element.extensions !== null && element.extensions.length > 0 ? element.extensions[0].saveDisplayName : "",
              savedDate: element.extensions !== 'undefined' && element.extensions !== null && element.extensions.length > 0 ? element.extensions[0].savedDate : "" });
});
On client-side potential storage metadata will be identified in two situations. While rendering the list item and in the potential next save dialog:
mails.forEach((m) => {
        listItems.push({
            header: m.from,
            content: m.subject,
            media: m.hasAttachments ? (attachmentIcon) : "",
            headerMedia: m.receivedDateTime,
            endMedia: m.alreadyStored ? savedIcon : "" });
});

return (
<div>
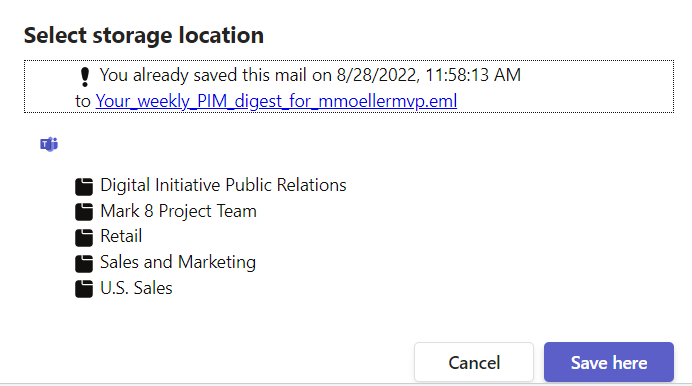
{props.mail.alreadyStored &&
<div className='saveHint'>
<div><RedbangIcon /> You already saved this mail on <span>{new Date (props.mail.savedDate).toLocaleString()}</span></div>
<div>to <a href={props.mail.savedUrl}>{props.mail.savedDisplayName}</a></div>
</div>}
<Breadcrumb>
....
You’ve seen a comfortable personal Teams tab application with many features, especially many Microsoft Graph endpoints. All implemented based on single-sign-on (SSO) in a secure and best practice way. It was shown how the same application could be implemented slightly different on various M365 products. Not yet, everything is possible but I can’t wait to see the same solution idea running in a messaging extension inside Outlook and inside an existing mail in inbox.
To have a look at the whole solution refer to my GitHub repository.

|
Markus is a SharePoint architect and technical consultant with focus on latest technology stack in Microsoft 365 Development. He loves SharePoint Framework but also has a passion for Microsoft Graph and Teams Development. He works for Avanade as an expert for Microsoft 365 Dev and is based in Munich. In 2021 he received his first Microsoft MVP award in M365 Development for his continuous community contributions. Although if partially inspired by his daily work opinions are always personal. |

3 thoughts on “Extend Teams apps to M365 with SSO the right way”