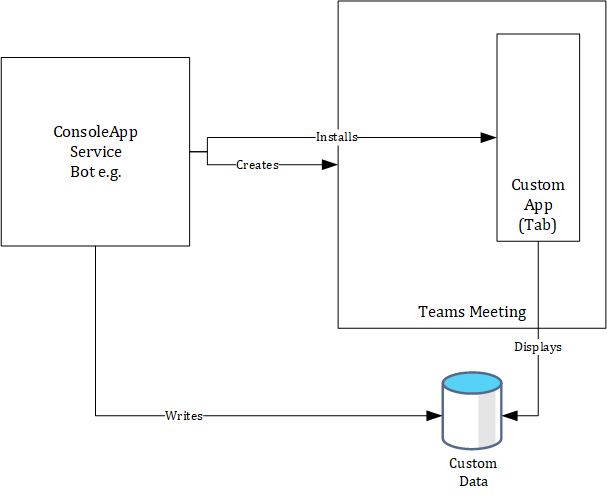
This post shows how to implement an action-based Teams and M365 Messaging Extension with Teams Toolkit for Visual Studio 2022 and using C#, Blazor incl FluentUI. Such Messaging Extensions can be used “across” Microsoft 365 in Teams but also Outlook or as Cópilot plugin. It will make use of rich UI capabilities implemented in so called task modules. But let’s see what this means in detail. First a quick look at the functionality to be implemented:
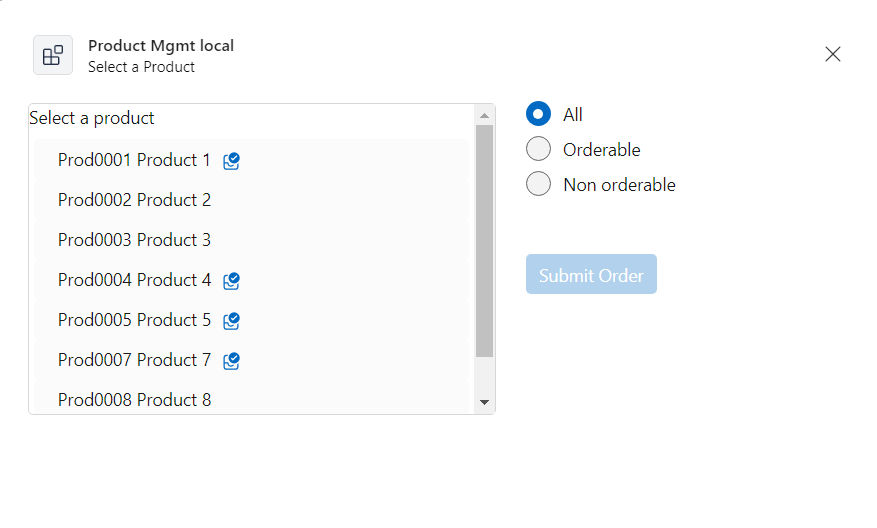
Once the action is called a task module is shown where the user can select the product and on selection, this product is returned to the users compose box, where it can be posted as an adaptive card. If orderable the product can be ordered by clicking the corresponding action and it will be returned with a read only card and the new orders value.
Content
- Setup
- Enable UI (Blazor)
- Initial Task Module
- Data selection
- Result (Adaptive Card)
- Outlook (M365) considerations
Setup
For setting up a solution first in Visual Studio 2022 a Teams Messaging Extension needs to be set up.

Unfortunately, this isn’t all as this project template doesn’t contain any kind of UI. But this will be established in the next section. So far some more adjustments to the (teams) manifest must be made.
"bots": [
{
 "botId": "${{BOT_ID}}",
 "scopes": [ "personal", "team", "groupchat" ],
 "isNotificationOnly": false,
 "supportsFiles": false
 }
],
"commands": [
  {
    "id": "selectItem",
    "context": [
      "compose",
      "message",
      "commandBox"
    ],
    "description": "Command to select item from a list",
    "title": "Select Item",
    "type": "action",
    "fetchTask": true
  }
},
…
“validDomains": [
    "${{BOT_DOMAIN}}",
    “token.botframework.com”
]
Enable UI (Blazor)
In a former post, I did already describe how to enable Blazor UI in a Teams messaging extension solution where it’s not available out of the box. This is still the case so here it will be described once again not only for the sake of completeness, but also for a more detailed and fixed version.
Although recommended with .Net8 to switch from a Blazor Web Assembly to a Blazor Web App I struggled a bit to be honest and sticked to the LTSC version of .Net6. As in the former description a server side application was chosen here once again it will be picked.
Against the assumption in the last post some more basic files for Blazor component routing are relevant/needed:

In the Program.cs the following lines need to be added, so staticFiles and Blazor components can be requested / routed
builder.Services.AddRazorPages();
builder.Services.AddServerSideBlazor(o => o.DetailedErrors = true);
builder.Services.AddHttpClient(…);
An App.razor is establishing basic routing while _imports.razor is responsible for imports valid for all razor components or pages.
As basic page “holder” of all developed Blazor components acts by default the _Host.cshtml. Here also the basic layout page (_Layout) is pulled in.
Foremost, here in the _Layout.cshtml some general scripts like FluentUI, TeamsJS SDK or blazor.server.js are loaded.
For the TeamsJS SDK against what the Teams Toolkit still normally offers I decided to go here with the latest stable one:
https://res.cdn.office.net/teams-js/2.19.0/js/MicrosoftTeams.min.jsThis is especially because of the needed but still a bit a behind of the production ready microsoftTeams.dialog.url.submit() JS function.
Also referring to a css file named like the ProjectAssembly is necessary.
<link href="MsgextActionSrchData.styles.css" rel="stylesheet" />This will later include all css directly added (by filenames + css) css files to their razor components.
FluentUI
After Blazor now it’s also time and possible to add the latest version available for.Net6 (or 7) of Blazor-FluentUI components which is 3.5.2.
At first two packages need to be added:
dotnet add package Microsoft.Fast.Components.FluentUI
dotnet add package Microsoft.Fast.Components.FluentUI.Icons
Next the following script needs to be loaded in the _Layout.cshtml.
https://unpkg.com/@@fluentui/web-components
Finally, in Program.cs the following line needs to be added:
builder.Services.AddFluentUIComponents();
Now the first UI component can be built.
Initial Task Module
The initial task module is called from fetchTask=true inside the teams manifest (see above under setup) and then forwarded to the bot backend code. Here it is handled and a Task is opened which consists a URL that represents a page displayed in an iframe.
string taskModuleUrl = $"{_config["BotEndpoint"]}initialaction";
return new MessagingExtensionActionResponse
{
  Task = new TaskModuleContinueResponse
  {
    Type = "continue",
    Value = new TaskModuleTaskInfo
    {
      Width = 720,
      Height = 360,
      Title = "Select a Product",
      Url = taskModuleUrl
    }
  }
};
The page is rendered by Blazor as set up above.
The core functionality inside the page representing the task module will be explained in the following sections.
JSInterop
On the EventHandler of the FluentButton handled once a product is selected and the button is clicked there is the problem. It expects a C# function but to proceed finally a JS call is needed. Teams JS SDK 2.0 is responsible to submit the task with only a single line of code:
microsoftTeams.dialog.url.submit()But this enforces a couple of problems. Although Teams Toolkit already supports some JSInterop functionality the whole tasks module is not available (additionally there is a new dialog module instead but not yet fully supported). As it’s only needed once in this single component the shortest way is to put it into 2 pieces inside the component. The C# part is the FluentButton calling a C# function.
<FluentButton Appearance="Appearance.Accent" @onclick="SubmitTeamsTask">Submit Task</FluentButton>
...
@code
{
    private async Task SubmitTeamsTask()
    {
        await JS.InvokeVoidAsync("submitTasks");
    }
And inside the SubmitTeamsTask the call to the plain JS function is done (assuming _Layout.cshtml or _Host.cshtml already loaded and initialized Teams JS SDK 2.0).
<script type="text/javascript">
    function submitTasks() {
        var hiddenLabel = document.getElementById('prodName');
        var selectedId = hiddenLabel.getAttribute('data-prodid');
        var selectedName = hiddenLabel.getAttribute('data-name');
        var selectedOrders = hiddenLabel.getAttribute('data-orders');
        var selectedOrderable = false;
        if (hiddenLabel.dataset.orderable !== undefined) {
            selectedOrderable = true;
        }
        var result = { Id: selectedId, Name: selectedName, Orders: selectedOrders, Orderable: selectedOrderable };
        microsoftTeams.dialog.url.submit();
    }
</script>
The “trick” here is a bit ‘old school but it’s simply a hidden label holding all the parameters from the selected product putting them in an object an sending it to the server.
<label id="prodName"
 class="hiddenLabel"
  aria-hidden="true"
 data-name="@SelectedItem?.Name"
 data-prodid="@SelectedItem?.Id"
 data-orders="@SelectedItem?.Orders"
 data-orderable="@SelectedItem?.Orderable">
Additionally it might be worth to add if no clear Task or better now Dialog is opened with the OnTeamsMessagingExtensionFetchTaskAsync method there might occur issues with submitting it by microsoftTeams.dialog.url.submit(result);
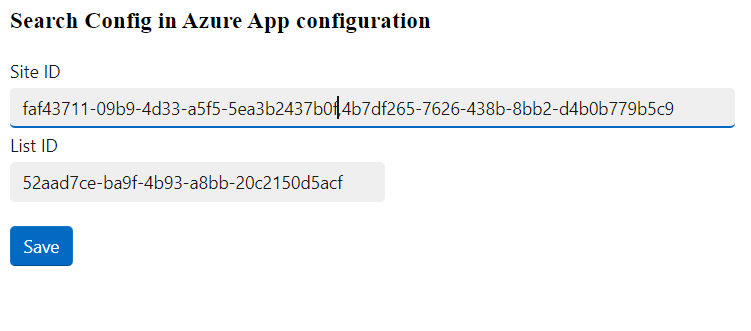
Data selection
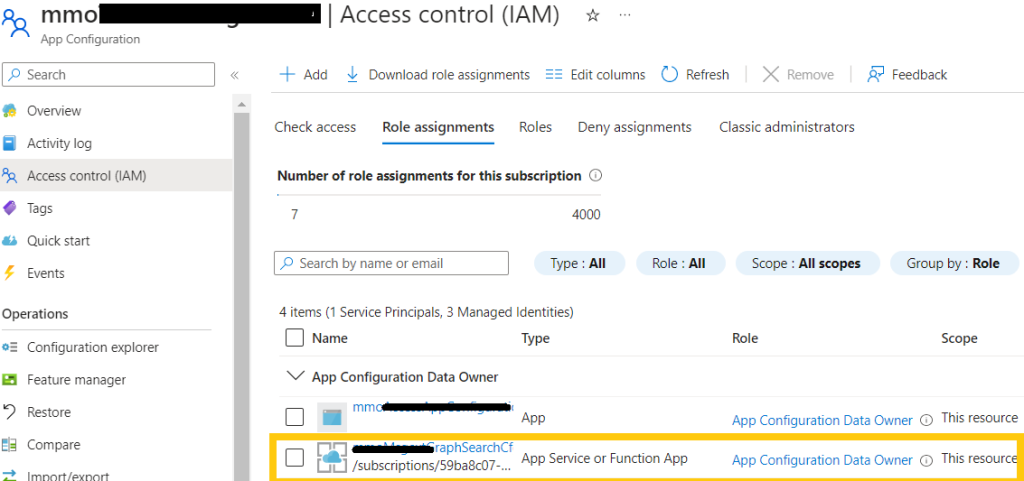
On the data side simply an Azure Table was chosen. This can be changed to any kind of data source needed and accessible of course. So the kind of data is not the focus here in this sample. It’s the dealing, the flow and processing with it as well as the options to display and access it from Microsoft 365.
The first thing was to present a rich UI (richer and more flexible as a simple adaptive card could present) on first request rendering the available data for further filtering or selection. Beside the simpler possibility in a search-based messaging extension here a so called task module, that is nothing else than a webpage rendered in an iframe giving a rich UI using Blazor and FluentUI shall be used (see above).
For data selection a simple WebApi Controller is established. With dependency injection it is made available to the Blazor components where three methods (for all, orderable or non-orderable) can be called.
public List<Product> GetAllProducts()
{
  List<Product> products = new List<Product>();
  Pageable<TableEntity> list = tableClient.Query<TableEntity>();
  foreach (TableEntity item in list)
  {
    Product p = new Product()
    {
      Id = item.PartitionKey,
      Name = item.RowKey,
      Orders = (int)item.GetInt32("Orders"),
      Orderable = (bool)item.GetBoolean("Orderable")
    };
    products.Add(p);
  }
  return products;
}
public List<Product> GetOrderableProducts()
{
  ...
}
public List<Product> GetNonOrderableProducts()
{
  ...
}
Once an item, that is a product in fact, is selected it can be sent back to the server on button click. This will then reach the bot’s backend controller. Here it will be transformed to an adaptive card and sent back to the user’s compose box.
Result (Adaptive Card)
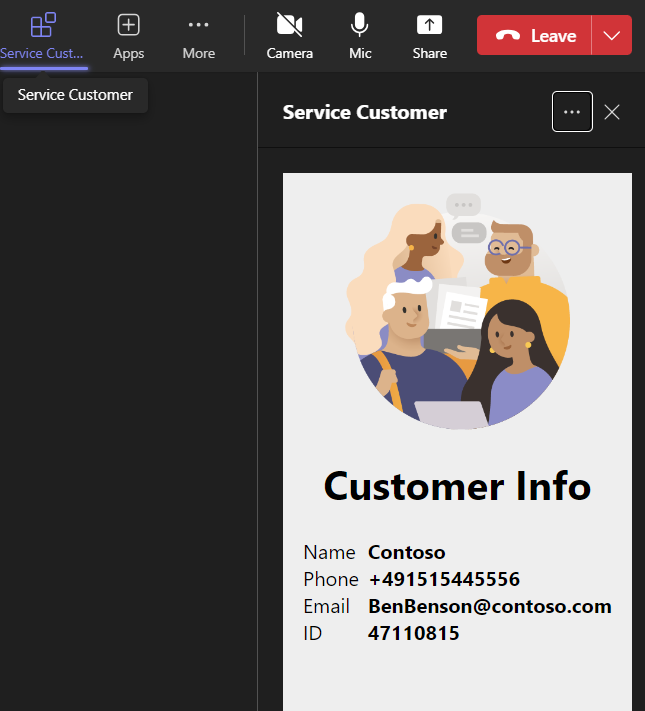
Turned into an adaptive card, the four values are taken and transformed: ID, Name and number of Orders are displayed and if the product is Orderable also an action is shown to order another amount of the corresponding product.
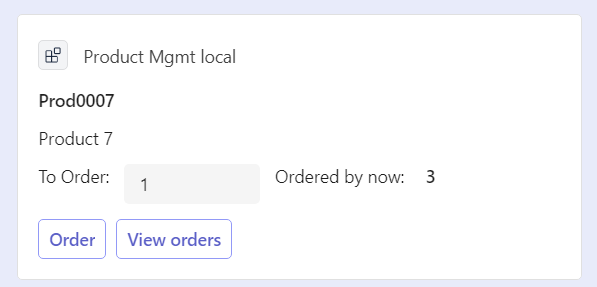
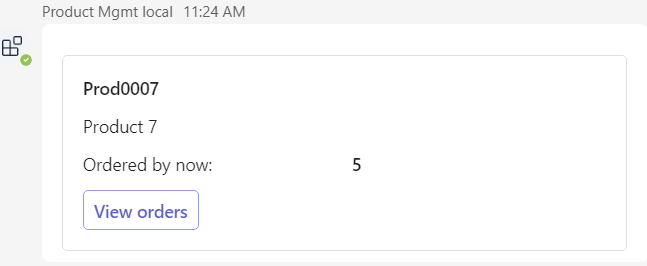
Performing an “Order” action will indeed increase the number of orders which can be checked by calling the original command once again. Performing the always visible “View” option will return another adaptive card with only view mode, no matter if orderable or not.
var actionData = ((JObject)invokeValue.Action.Data).ToObject<ProductUpdate>();
...
// Update Orders
ProductController productCtrl = new ProductController(_config);
Product resultProduct = productCtrl.UpdateProductOrders(actionData);
Inside the bot framework method the product incl update value is received. This can be transferred to the ProductController to update the orders value correctly.
public Product UpdateProductOrders(ProductUpdate product)
{
  TableEntity pEntity = tableClient.GetEntity<TableEntity>(product.Id, product.Name);
  int newOrders = product.Orders + product.orderId;
  pEntity["Orders"] = newOrders;
  tableClient.UpdateEntityAsync(pEntity, pEntity.ETag);
  TableEntity updatedEntity = tableClient.GetEntity<TableEntity>(product.Id, product.Name);
  return new Product()
  {
    Id = updatedEntity.PartitionKey,
    Name = updatedEntity.RowKey,
    Orders = (int)updatedEntity.GetInt32("Orders"),
    Orderable = (bool)updatedEntity.GetBoolean("Orderable")
  };
}
Outlook (M365) considerations
Although this solution approach is considered not only for Teams but as a Microsoft 365 across solution at the time of writing for Outlook action based and task modules are still in preview.
The solution needs at least manifest version 1.13+ but with currently created solutions this should be no problem.
For the bot it is necessary to add the “Microsoft 365 channel” which might confuse a bit at a first glance because there is an Outlook channel, too. But in fact this is no longer used. So adding the Microsoft 365 channel is the only but mandatory prerequisite:

Otherwise the invoke request will get an “BotNotConfiguredForChannel” error.
But if configured correctly this results now in the capability to open the extension via “App” in a new created Email and insert an adaptive card in the Email’s compose box same way as already described for Teams.
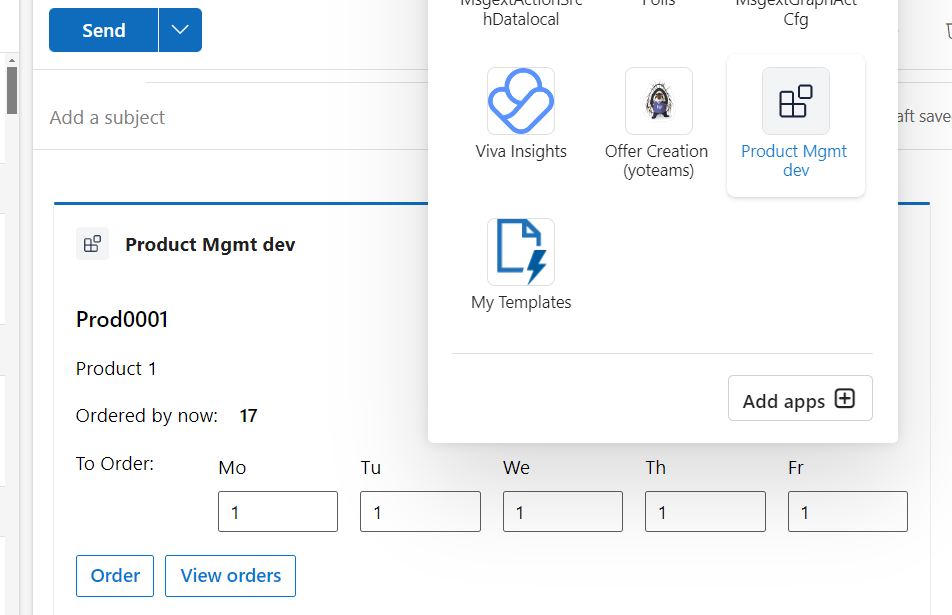
In my first community call presentation about Microsoft 365 across apps I criticized or missed that messaging extensions do not offer action-based variants including task modules beyond Teams. Now they are available as seen here. An interesting scenario will be how to use them as copilot plugins. This sample is going to be tried out soon in that direction and likely extended. Meanwhile, for your reference the whole sample is already available in my GitHub repository.

|
Markus is a SharePoint architect and technical consultant with focus on latest technology stack in Microsoft 365 Development. He loves SharePoint Framework but also has a passion for Microsoft Graph and Teams Development. He works for Avanade as an expert for Microsoft 365 Dev and is based in Munich. In 2021 he received his first Microsoft MVP award in M365 Development for his continuous community contributions. Although if partially inspired by his daily work opinions are always personal. |