
In the recent past I started to create/rebuild my existing Teams app samples towards C# using the Teams Toolkit for Visual Studio. I enabled usage of Microsoft Graph Toolkit, established SSO to access Microsoft Graph in a WebApi backend application or configured a Message Extension with Bot SSO. Despite the move to C# and Visual Studio I still used a lot of Javascript in the frontend, to get field values or start grabbing Teams context and bootstrap token. In this post and with the latest version of Teams Toolkit for Visual Studio (17.7) I want to rebuild another sample using completely Blazor and C# even for the frontend stuff.
The sample is a “Microsoft 365 across” application, a personal Teams Tab also to be used in Outlook, M365 (and SharePoint) creating an offer document in SharePoint based on a custom Word template and enriched by custom metadata. The initial sample based on NodeJS and yo teams can be found here for comparison.
Content
The form
Beyond the prerequisites of a custom content type the first thing needed is an input form for the metadata:
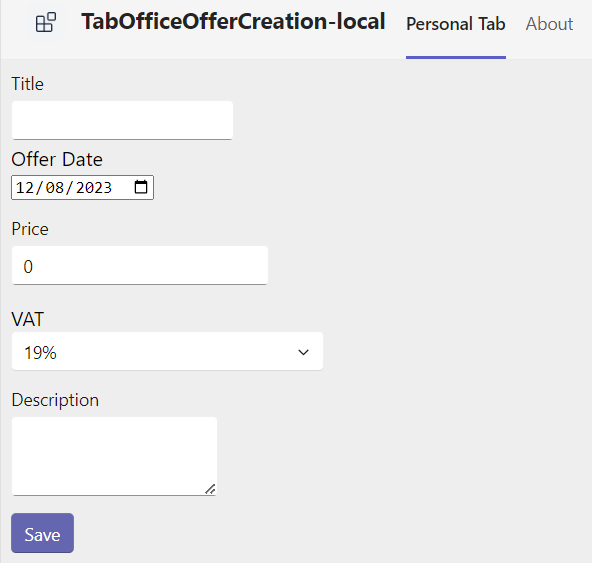
In Blazor this is established like this:
<EditForm Model="@exampleModel" OnSubmit="@load" >
  <div className="form">
      <div>
          <FluentTextField @bind-Value="@exampleModel.Title">Title</FluentTextField>
      </div>
      <div>
          <InputDate @bind-Value=@exampleModel.OfferDate />
      </div>
      <div>
          <FluentNumberField @bind-Value="@exampleModel.Price" Step=".01">Price</FluentNumberField>
      </div>
      <div>
          <FluentSelect Items=@vatOptions OptionText="@(i => i.Text)" OptionValue="@(i => i.Value)" @bind-Value="@exampleModel.SelectedVAT">VAT</FluentSelect>
      </div>
      <div>
          <FluentTextArea Resize="TextAreaResize.Vertical" @bind-Value="@exampleModel.Description">Description</FluentTextArea>
      </div>
      <div className="formButton">
        <FluentButton Appearance="Appearance.Accent" Type="ButtonType.Submit">Save</FluentButton>
      </div>
    </div>
 </EditForm>
....
@code {
    public Offer exampleModel = new()
    {
        OfferDate = DateTime.Today,
        SelectedVAT = ".19"
    };
.....
The first thing is an EditForm bound to a Class representing the Offer object. All the field controls are then bound to a specific class attribute such as Title. The object itself is instantiated initially with some default values in the @code {} section. The “Save” button only executes a simple Submit. What exactly happens on this event is defined in the EditForm as well: OnSubmit="@load". The load function can be found in the @code {} section as well.
But except a loading indicator established by a FluentProgressRing and a simple result display this function is mainly dedicated to establish a backend connection. Therefore, it is covered in the next two sections.
SSO
To establish a backend connection at first an authentication token is needed. Having that a HttpClient can call the backend WebApi, while the function finally can handle the response.
async void load()
{
        isLoading = true;
        var result = await teamsUserCredential.GetTokenAsync(new TokenRequestContext(new string[] { }), new System.Threading.CancellationToken());
        string token = result.Token;
        var request = new HttpRequestMessage(HttpMethod.Post,
            "/api/Graph");
        request.Headers.Add("Accept", "application/json");
        request.Headers.Add("User-Agent", "HttpClientFactory-Sample");
        request.Content = new StringContent(JsonSerializer.Serialize(exampleModel), Encoding.UTF8, "application/json");
        var client = ClientFactory.CreateClient();
        client.BaseAddress = new Uri(MyNavigationManager.BaseUri);
        client.DefaultRequestHeaders.Authorization = new AuthenticationHeaderValue("Bearer", token);
        var response = await client.SendAsync(request);
        if (response.IsSuccessStatusCode)
        {
            resultMessage = await response.Content.ReadAsStringAsync();
        }
        isLoading = false;
        StateHasChanged();
}
First with the teamsUserCredential a token can be requested. As currently only an id or bootstrap token is needed, an empty scope new string[] { } can be provided. This will result in an access_as_user permission only inside the token (check with jwt.ms for instance). For the final Graph access token the backend WebApi is responsible. The call itself is no rocket science anymore. With an AuthenticationHeaderValue("Bearer", token) the request.Content containing the custom form object exampleModel can be POSTed. In case of a successful request the response will be the webUrl of the created document which can be presented as a link in the UI.
Backend WebApi
While Teams Toolkit for Visual Studio already provides the Microsoft Graph .Net SDK in a version 5 for usage in a WebApi controller the following two packages still need to be added:
<PackageReference Include="Microsoft.Identity.Web" Version="2.13.2" />
<PackageReference Include="Microsoft.Identity.Web.GraphServiceClient" Version="2.13.2" />
Having that in Program.cs some services can be added via dependency injection:
builder.Services
    // Use Web API authentication (default JWT bearer token scheme)
    .AddMicrosoftIdentityWebApiAuthentication(builder.Configuration, "TeamsFx:Authentication")
    // Enable token acquisition via on-behalf-of flow
    .EnableTokenAcquisitionToCallDownstreamApi()
    // Add authenticated Graph client via dependency injection
    .AddMicrosoftGraph(builder.Configuration.GetSection("Graph"))
    // Use in-memory token cache
    // See https://github.com/AzureAD/microsoft-identity-web/wiki/token-cache-serialization
    .AddInMemoryTokenCaches();
I clearly prefer that way against what is simply offered to you in the current Teams Toolkit template: Using Microsoft Graph SDK directly inside the Blazor components. In my personal opinion it is much clearer, especially towards more complex enterprise scenarios to have a dedicated WebApi controller. And in case of a C# Teams app which you need to host in Azure or similar anyway (while in SPFx for instance the much leaner hosting might speak against a dedicated backend component).
So if a request arrives at the backend a GraphController is established and by dependency injection the constructor can expect the following:
[Route("api/[controller]")]
[ApiController]
public class GraphController : ControllerBase
{
        private readonly GraphServiceClient _graphClient;
        private readonly ITokenAcquisition _tokenAcquisition;
        private readonly ILogger<GraphController> _logger;
        public GraphController(ITokenAcquisition tokenAcquisition, GraphServiceClient graphClient, ILogger<GraphController> logger)
        {
            _tokenAcquisition = tokenAcquisition;
            _graphClient = graphClient;
            _logger = logger;
        }
....
Having that, the main POST function can look like this while any Microsoft Graph operation takes place in an extracted own private function.
 [HttpPost]
public async Task<ActionResult<string>> Post(Offer offer)
{
            SiteDrive siteDrive = await getDriveIdByUrl(SiteUrl);
            DriveItemResult docTemplateInfo = await getFileInfoName(siteDrive.SiteId, "DocumentTemplate.docx");
            DriveItem newFile = await createNewDocument(siteDrive.DriveId, $"{offer.Title}.docx", siteDrive.RootId, docTemplateInfo.Id);
            DriveItemResult newFileInfo = await getFileInfoName(siteDrive.SiteId, $"{offer.Title}.docx");
            bool update = await updateLibraryItem(siteDrive.SiteId, siteDrive.DriveId, offer, newFileInfo.Id);
            if (update)
            {
                return Ok(newFileInfo.WebUrl);
            }
            else
            {
                return BadRequest("Something went wrong");
            }
}
Having retrieved the custom offer object at first a dedicated template (here hardcoded: „DocumentTemplate.docx“) needs to be detected for the following steps.
As one specific operation next a “copy” of the template needs to be executed. In detail it looks like this:
private async Task<DriveItem> createNewDocument(string driveId, string fileName, string rootId, string fileTemplateId)
{
        var requestBody = new Microsoft.Graph.Drives.Item.Items.Item.Copy.CopyPostRequestBody
        {
            ParentReference = new ItemReference
            {
                DriveId = driveId,
                Id = rootId
            },
            Name = fileName
        };
        var result = await _graphClient.Drives[driveId].Items[fileTemplateId].Copy.PostAsync(requestBody);
        return result;
}
As parameters the source item (filetemplateId), the target location (assuming root of the drive (library)) and the target filename are necessary. Having that, mostly in a body, the Copy endpoint is another simple Graph call. Unfortuantely, the result is not yet the driveItem as this copy is treated as a “long running operation“. Currently the SDK simply returns null and no indication on the existing operation. In this simplified scenario another following operation tries to detect the (hopefully) created new document. This enables the final operation to update the corresponding listItem‘s metadata:
private async Task<bool> updateLibraryItem(string siteId, string driveId, Offer offer, string driveItemId)
{
      ListItem listItem = await _graphClient.Drives[driveId].Items[driveItemId].ListItem.GetAsync();
      int listItemId;
      Int32.TryParse(listItem.Id, out listItemId);
      FieldValueSet fields = new FieldValueSet
          {
              AdditionalData = new Dictionary<string, object>
              {
                  {
                      "Title",
                      offer.Title
                  },
                  {
                      "OfferingDescription",
                      offer.Description
                  },
                  {
                      "OfferingNetPrice",
                      offer.Price.ToString()
                  },
                  {
                      "OfferingDate",
                      offer.OfferDate.ToString("s")
                  },
                  {
                      "OfferingVAT",
                      offer.SelectedVAT
                  }
              }
          };
      var result = await _graphClient.Sites[siteId].Lists["Documents"].Items[listItem.Id].Fields.PatchAsync(fields);
      return result.Id == listItem.Id;
}
The most interesting part here is the FieldValueSet as it shows how to treat the different column types, as we have here a text, textarea, a DateTime, a number and a percentage. But also refer to my dedicated blog post on writing list items and column data.
Response
As omitted but mentioned above there is also a response handling in the UI. First there is a Spinner or FluentProgressRing to indicate that the backend operation is running. It is controlled by a bool isLoading which is set to true at the beginning and re-set to false at the end of the backend operation. This looks like this in action:
In code it looks like this:
@if (isLoading)
{
    <div style="display: flex; justify-content: center; align-items: center;">
        <FluentProgressRing />
    </div>
}
@if (resultAvailable)
{
    <label>Document was created and can be found <a href=@resultMessage> here</a></label>
}
@code {
    ...
    async void load()
    {
        isLoading = true;
        resultAvailable = false;
        ...
        if (response.IsSuccessStatusCode)
        {
            resultMessage = await response.Content.ReadAsStringAsync();
            resultAvailable = true;
        }
        isLoading = false;
        StateHasChanged();
    }
In terms of a successful operation another bool resultAvailable is set to true. Also the result, that is the webUrl of the created document, is written to a variable. Both is used to display the result as a label with a link. But to update the page finally StateHasChanged(); has to be called and that’s it.
Although the original NodeJS sample used SharePoint Rest Api I started to rebuild it with Microsoft Graph. The handling is not perfect, yet. But also treat this sample as a ‘pattern’ how you can establish your own Microsoft Graph based Teams application. May it be a personal tab, with or without M365 across scenario or a configurable Tab. In a next version I will try to establish access to SharePoint CSOM (PnP.Core) which is still more comfortable for this kind of solution. Also the search-based message extension from the final version of the “original” is missing. Once it becomes easy with Teams Toolkit for Visual Studio to add additional Teams application types to an existing one I’ll cover and add that as well. Meanwhile the current version of the full solution is available in my GitHub repository.

|
Markus is a SharePoint architect and technical consultant with focus on latest technology stack in Microsoft 365 Development. He loves SharePoint Framework but also has a passion for Microsoft Graph and Teams Development. He works for Avanade as an expert for Microsoft 365 Dev and is based in Munich. In 2021 he received his first Microsoft MVP award in M365 Development for his continuous community contributions. Although if partially inspired by his daily work opinions are always personal. |

It might just be me but the Teams Toolkit link points to the VS Code version which confused me a lot until I saw the sln file in the source.
LikeLike
Sorry but which link exactly are you talking about?
LikeLike
In your readme on github, the link to Teams Toolkit points to the VSCode version.
LikeLike
Ah okay, I will have a look and update. Original documentation of the VS version was just published this week and also my GitHub repo will get another update: Using SP API alternatively
LikeLike
There is the fix:
https://github.com/mmsharepoint/tab-office-offer-creation-csharp/tree/dev
LikeLike