
Automatic provisioning processes of SharePoint sites Microsoft 365 groups or nowadays Microsoft 365 Teams have a long history. Security was always a concern but with evolving ZeroTrust scenarios it becomes more important than ever. Automatic processes usually run unattended so access to all resources are a regular requirement but not really wanted. In this post I want to dig into the capabilities Microsoft Teams has for the scenario to allow unattended creation AND maintenance on specific groups of Teams but not on all of them. This is called resource specific consent (RSC).
Series
- Demystifying Teams creation in Microsoft 365
- Demystifying Teams creation with resource specific consent (RSC) in Microsoft 365
Content
- Create Teams
- Application registrations
- Give specific consent
- Permissions
- Maintenance
- Summary and outlook
Although resource specific consent for Microsoft Teams is not very new and even available before SharePoint adopted that technology (which I already wrote about by the way) since arriving of this there was not much written about. So let’s try to make this much more popular here.
Create Teams
As seen in the last part there are two options to create Teams: Create Group first option and directly create Teams option. Now that works the same here? And what is now the best one? Does it change? As seen from the last part only for creation of Teams no critical permissions are needed, especially when only users shall be owners or members so this simplified scenario will be used moving forward.
And as there is a need to work with a full Team, the way of creation doesn’t really matter here. So the debate if this or that direction in creation is better, can be left in the last post as well for the moment.
Application registrations
For more granular permissions a distinction between creation and maintenance process shall be taken. So at least two application registrations are needed.
- App registration for creation (incl “teamify” and initial owner/member adding)
- Secret or Self-signed certificate needed, Group.Create Team.Create User.Read.All (Directory.ReadWrite.All) TeamsAppInstallation.ReadWriteAndConsentForTeam.All
- One or more App registration(s) for running maintenance processes on (category of) Teams
- Secret or Self-signed certificate needed, NO Graph permissions
As unattended application mode is used for calls, a secret or self-signed certificate is needed to generate an access token. For the first application permissions need to be granted so groups 1st + teamify or teams directly can be created.
The latter application registration so far does not need any Microsoft Graph permissions directly at all.☝🏻 But the app id is used at several positions in later steps so to follow it a “special masked” value already introduced here: XXxxXXXXX-XxXX-xXXX-XXxx-XXXXXXXxxxXX
Give specific consent
In a next step there might/should be the need to grant administration privileges to a specific team or a category or a bunch of them.
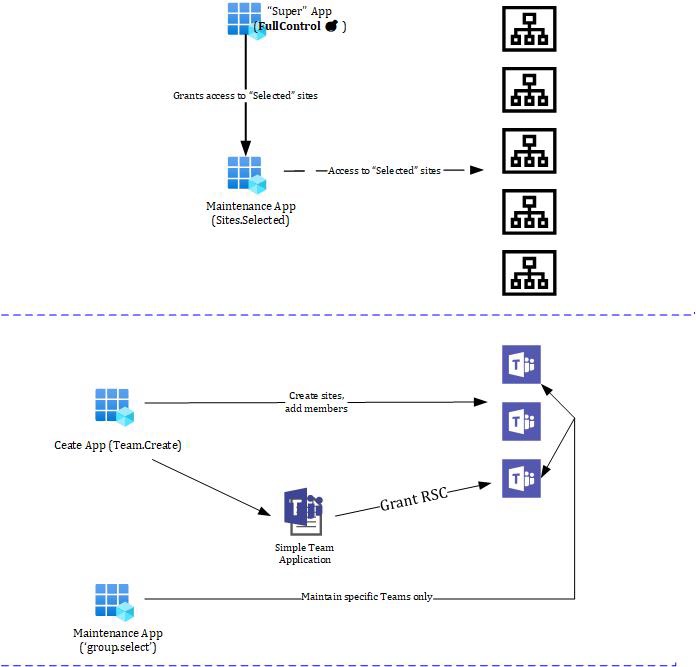
While in SharePoint this from the beginning worked directly (I described that scenario a while ago) the permissions needed to grant consent from one highly privileged app/user to specific Sites were unacceptable high with Sites.FullControl.All
In Teams this works a bit different. There is no only 1:1 relationship between a Team and an app registration from Entra ID anymore. “In the middle” there is also a Teams application now and this, on Installation, is responsible to grant required but resource specific permissions ONLY ☝🏻 on the the Team where installed.
The difference seems visually clear? So what about a little walkthrough?
A simple Teams App with the right but bare minimum security requests in the manifest is needed and should be uploaded to the org app catalog. Here is a simple bare minimum teams app manifest for this which can be used for that without any “real app parts” such as bots, static or configurable tabs e.g.
{
  "$schema": "https://developer.microsoft.com/en-us/json-schemas/teams/v1.16/MicrosoftTeams.schema.json",
  "manifestVersion": "1.16",
  "version": "2.0.0",
  "id": "90eedbf6-dc55-4b98-a848-e48719266134",
  "packageName": "com.microsoft.teams.extension",
  "developer": {
    "name": "Teams App, Inc.",
    "websiteUrl": "https://www.example.com",
    "privacyUrl": "https://www.example.com/privacy",
    "termsOfUseUrl": "https://www.example.com/termsofuse"
  },
  "icons": {
    "color": "color.png",
    "outline": "outline.png"
  },
  "name": {
    "short": "MyTeamsMaintenance",
    "full": "Full name for MyTeamsApp5"
  },
  "description": {
    "short": "Short description of MyTeamsApp5",
    "full": "Full description of MyTeamsApp5"
  },
  "webApplicationInfo": {
    "id": "XXxxXXXXX-XxXX-xXXX-XXxx-XXXXXXXxxxXX",
    "resource": "https://RscBasedStoreApp"
  },
  "authorization": {
    "permissions": {
      "resourceSpecific": [
        {
          "name": "TeamSettings.ReadWrite.Group",
          "type": "Application"
        }
      ]
    }
  }
}
The id can be useful to retrieve a tenant-individual app catalog id which is necessary for later steps. See a call for this or an alternative in the next step.
Get app id from catalog (tenant individual!):
https://graph.microsoft.com/v1.0/appCatalogs/teamsApps?$filter=distributionMethod eq 'organization' and displayName eq 'MyTeamsMaintenance'

OR by the ID from App Manifest (unindividual from tenant)

https://graph.microsoft.com/v1.0/appCatalogs/teamsApps?$filter=externalId+eq+'90eedbf6-dc55-4b98-a848-e48719266134'

"value": [
        {
            "id": "",<AppID_FromCat>
            "displayName": "MyTeamsMaintenance",
No matter which way of request (over the app individual external id or the given name) is chosen, the result is beneath other values a tenant individual app id which is needed for the next request: Installing. that app inside the just created team.
Install that app in the Team:
https://graph.microsoft.com/v1.0/teams/<TeamID>/installedApps

{
    "teamsApp@odata.bind": "https://graph.microsoft.com/v1.0/appCatalogs/teamsApps/<AppID_FromCat>",
    "consentedPermissionSet": {
        "resourceSpecificPermissions": [
            {
                "permissionValue": "TeamSettings.ReadWrite.Group",
                "permissionType": "application"
            }
        ]
    }
}
Test the result:
https://graph.microsoft.com/v1.0/teams/<YOUR_TEAM_ID>/permissionGrants
...
"value": [
        {
            "id": "eaVu2UipZG8_gI2-LnLbtrCQGT4zcHRZGj6f-zAy05A",
            "clientAppId": "XXxxXXXXX-XxXX-xXXX-XXxx-XXXXXXXxxxXX",
            "resourceAppId": "00000003-0000-0000-c000-000000000000",
            "clientId": "17d2372f-aad1-41eb-bdf3-6499dbaca34a",
            "permissionType": "Application",
            "permission": "TeamSettings.ReadWrite.Group"

        }
    ]
And a decoded token will look like the following:
{
  "typ": "JWT",
  "nonce": "d6jHapSPtm8HI0C-ieWitrS3bkVH_Qk2Y10iazpfGjE",
  "alg": "RS256",
  "x5t": "T1St-dLTvyWRgxB_676u8krXS-I",
  "kid": "T1St-dLTvyWRgxB_676u8krXS-I"
}.{
  ....,
  "app_displayname": "TeamsRSCMaintenanceApp",
  "appid": "XXxxXXXXX-XxXX-xXXX-XXxx-XXXXXXXxxxXX",
  "appidacr": "1",
  "idp": "https://sts.windows.net/<>TENANT_ID/",
  "idtyp": "app",
  "oid": "17d2372f-aad1-41eb-bdf3-6499dbaca34a",
  "rh": "0.AU4AcdB3fgjtika8deglS6d6IQMAAAAAAAAAwAAAAAAAAABOAAA.",
  "roles": [
    "Group.Selected"
  ],
  "sub": "17d2372f-aad1-41eb-bdf3-6499dbaca34a",
  "tenant_region_scope": "EU",
  ....
}.[Signature]
Shortened for brevity but all the necessary properties can be detected. Clearly there is an app token and interesting role with “Group.selected”. That’s what it shall do further, to try to maintain specific Groups/Teams there is access to while to others is not.
Also the resource specific (masked) app registration XXxxXXXXX-XxXX-xXXX-XXxx-XXXXXXXxxxXX can be clearly followed here: Entered to the app manifest in combination with rsc permission requests only, installed to secifiic Teams and returned back (if installed).
Having that the Group.selected token can get the Group or Team and even manipulate this like the description. Not to mention all deeply folded Team’s fun e.g. settings on consented Teams only, of course.
Permissions
To establish this setup so far from a permission point of view and already shown in previous post (see link above) the following permissions are needed. Only the Grant Consent column is new here and responsible for the Teams Application installation which will give the resource specific consent as explained.
| Create | Initial Members / Owners | Teamify | Grant Consent | Maintain (RSC) |
|---|---|---|---|---|
| Group.Create | User.Read.All Directory.Read.All | +Team.Create | TeamsAppInstallation.ReadWriteAndConsentForTeam.All | TeamSettings.ReadWrite.Group |
| Team.Create | User.Read.All Directory.Read.All | N / A | TeamsAppInstallation.ReadWriteAndConsentForTeam.All | TeamSettings.ReadWrite.Group |
That was the first part of permissions that can or need to be used for creation of the Teams.
The second part belongs to the maintenance part. This post will concentrate on the highest available permission “TeamSettings.ReadWrite.Group” that is able to manipulate a whole team, respectively its underlying group (but not to delete or adding/removing Team members ☝🏻). There are more granular permissions that can be used for other scenarios, too.
Maintenance
Finally, it’s time to test what was done. No matter how sensitive the request operation is, with the specific but high privileged permission “TeamSettings.ReadWrite.Group” any operation such as Read or Modify on a consented Team should work or not if not consented.
GET https://graph.microsoft.com/v1.0/teams/<TeamID>Will simply return the Team or result in a 403 (Forbidden).
PATCH https://graph.microsoft.com/v1.0/teams/<TeamID>
{
    "visibility": "public"
}
Will return a 201 with an empty result if positive. A negative response will return “Method not allowed which also makes sense at a second glance because already the Uri including the <TeamsID> is not reachable, not matter which Http method to be chosen.
Summary and outlook
At a first glance it looks like the Teams approach for resource specific consent (RSC) needs a bit more complexity to be established. But at a second look the help of an “in the middle app” to grant permissions makes sense. It acts like a predefined template for one or a set of permissions and can be granted by applying to specific resources. Not only Teams but others are not covered here.
Only an option to even allow to specifically delete a Team may be missed which would be possible by the more general scenario using Groups.ReadWrite.All
SharePoint currently seems to do it simpler but with the downside of a nearly unacceptable permission requirement compared to the sensitive scenario of specific access to sites (which by the way from a user perspective could be given by a site owner or site collection administrator. No tenant administrator needed what would more be an equivalent for Sites.FullControl.All)
Looking forward to a new announced feature for SharePoint around “Sites.Create.All”. Currently announced for March 2024. Let’s see how this approach solves Site provisioning with “least privilege” approach. So far here were the insights for Teams and how it can be done custom or why and how a commercial solution should be challenged for permission requirements.

|
Markus is a SharePoint architect and technical consultant with focus on latest technology stack in Microsoft 365 Development. He loves SharePoint Framework but also has a passion for Microsoft Graph and Teams Development. He works for Avanade as an expert for Microsoft 365 Dev and is based in Munich. In 2021 he received his first Microsoft MVP award in M365 Development for his continuous community contributions. Although if partially inspired by his daily work opinions are always personal. |


