
For many, many years now I use PnP provisioning to create SharePoint artefacts. In my routine, I created lots of best practices, but never wrote them down. As I still meet many colleagues doing it different and awkward, I now decided to write down some very own best practices as suggestions to simplify your handling of PnP Provisioning Templates.
Content
Editor and Template
The first thing is which editor to use and why. I prefer Visual Studio and I also enhance the Provisioning template header with the following XML.
<pnp:Provisioning xmlns:pnp="http://schemas.dev.office.com/PnP/2022/09/ProvisioningSchema" xmlns:xsi="http://www.w3.org/2001/XMLSchema-instance"
                  xsi:schemaLocation="http://schemas.dev.office.com/PnP/2022/09/ProvisioningSchema https://raw.githubusercontent.com/pnp/PnP-Provisioning-Schema/master/PnP.ProvisioningSchema/ProvisioningSchema-2022-09.xsd">
This enables to have validation and autocomplete for the given provisioning template version (here: 2022-09) as it downloads the .xsd if Visual Studio is configured correctly. For VSCode there are extensions for this as well.
Next comes, how to start creating a Provisioning template. A typical scenario is creating a click dummy in the UI and retrieve it as a starting template. Having that or reusing existing templates from previous scenarios, leads you to the point of polishing. The next steps show how to improve existing template parts. Some more tips on retrieving a template will follow at the end.
Columns
No matter what comes from a retrieved template a column should always start with ID and NAME. This makes it easy to reuse/refer the column in content types, lists or views by simply cut&paste.
<Field ID=”” Name=”” …
Name and StaticName should never contain blanks or special characters. Only DisplayNames can contain those. Ideally it looks something like this:
<Field ID=”” Name=”FieldName” StaticName=”FieldName” DisplayName=”Field Name”
In a ClickDummy it’s easy to achieve this by creating a column called “FieldName” and later rename it to “Field Name”. This only changes the DisplayName while Name and StaticName stay as is.
When directly creating fields with names containing blanks, it results in ugly (internal) names consisting “ _x0020_” instead of blanks for instance. Developers dealing with field names hate that.
Keep it short is often a good rule and here as well. Therefore, all defaults should be removed from the template to concentrate on the “customizations”. Attribute default values to be removed are those such as
- FillInChoice=”FALSE”
- Required=”FALSE”
- EnforceUniqueValues=”FALSE”
- Indexed=”FALSE”
- SourceID=”…”
One special attribute should be removed always, which is
- Version=”..”
This should be handled by SharePoint automatically and otherwise there might occur errors such as “Someone else changed this item …”
Finally there is a clear recommendation to order the custom columns by adding a custom group to site columns.
<Field ID=”” Name=”FieldName” Group=”MyCustomName”
Content Types
Another typical use case is: Apply your custom content type to a list AND remove the default one(s). While PnP Provisioning in general is very intelligent in doing all the steps in the right order, here you need to take care for.
First the new content type needs to be added and then the default one(s) can be removed without raising an error:
<pnp:ListInstance Title="Events" TemplateType="106" Url="Lists/Events" ...>
     <pnp:ContentTypeBindings>
         <pnp:ContentTypeBinding ContentTypeID="0x010200C3B7FC421010E842BD2B1A73E196D701" Default="true" />
         <pnp:ContentTypeBinding ContentTypeID="0x0102" Remove="true" />
     </pnp:ContentTypeBindings>
The order of <pnp:ContentTypeBinding /> is important. First we add the customized one (longer ID …) as default and then remove the basic “Event” content type. The other way round would fail.
Finally there is a clear recommendation to order the custom content types by adding a custom group to site content types.
<pnp:ContentType ID="0x0100B1EB031..." Name="CT" Group="01MyContentTypes">Get templates
Not only as a starting point but also during updates: To persist any existing site artefacts Get-PnPSiteTemplate is a good choice to start that process. As said above, usually you should polish / reduce those received templates. To avoid errors, but also to point out the relevant settings. As the existing XML can be treated as a good “documentation” on its own.
In update scenarios typically only specific updates are considered: For instance only Fields or Lists …
To reduce the retrieved template and time but also to find faster what you need for Copy&Paste there is the capability of using -Handlers. This enforces PnP to only retrieve the specified artefacts (for instance Fields but not ContenTypes, Lists …)
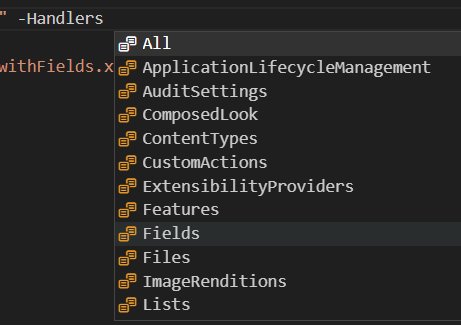
The whole command then looks like this for Fields for instance:
Set-PnPTraceLog -On -Level Debug
Get-PnPSiteTemplate -Out "C:\Temp\Template.xml" -Handlers Fields
Finally, it’s always a good idea to turn on the logging with Set-PnPTraceLog. This makes it much easier to identify any issues while retrieving or invoking any SiteTemplate.
Two consecutive templates
Although, as already mentioned, PnP provisioning is quite intelligent in terms of the right order doing things, there might be occasions where this isn’t possible. An always suitable solution for those cases is to provision to consecutive templates one after the other. In the first template, everything that has no dependency or something else is dependant on, will be placed. The second template simply contains all things that depend on artifacts provisioned with template 1.
Also, things that need some time to be fully established should be provisioned in a first template, while things, depending on them, should be provisioned in a second template. Eventually, in between you need to make sure things you depend on, meanwhile exist before continuing with the second template. This will be done with PowerShell or code of course, which controls the provisioning process.
Hope my very own best practices on the fantastic PnP provisioning engine and template handling were helpful for you. I am using this since years now and quite regularly. So in the near future I might add or update the one or other section here. Stay tuned.

|
Markus is a SharePoint architect and technical consultant with focus on latest technology stack in Microsoft 365 Development. He loves SharePoint Framework but also has a passion for Microsoft Graph and Teams Development. He works for Avanade as an expert for Microsoft 365 Dev and is based in Munich. In 2021 he received his first Microsoft MVP award in M365 Development for his continuous community contributions. Although if partially inspired by his daily work opinions are always personal. |
