
In SharePoint, there are several options to set up a navigation. From a basic site navigation over the hub site navigation towards a global navigation. All of them have in common their content is more or less static. That is, someone has to configure it manually.
In organizations with organic growth, so to say users dynamically create content or sites won’t immediately reflect this growth in terms of navigation. The best solution to solve this is a custom and search driven navigation. This post will illustrate one way of implementing this.
Series on sample
- A search-driven navigation [THIS POST]
- Dealing with permissions
- Dealing with external sharing
Content
- Establish the SPFx application extension
- Search for Sites
- List Teams
- Deal with Hub sites
- UI: The CommandBar
Establish the SPFx application extension
A good position for a navigation is the top of the page. Therefore, a SharePoint Framework (SPFx) Application extension using the top placeholder is a good choice.
Currently (SPFx 1.17.4) there is a need for a small fix when an application placeholder shall be using React functional components. The following React packages need to be installed explicitly:
npm i react@17.0.1 react-dom@17.0.1 @types/react@17.0.45 @types/react-dom@17.0.17 --save-exactTo debug an application extension once gulp serve --nobrowser is run, the following Url part needs to be added to to any given site url:
?loadSPFX=true&debugManifestsFile=https://localhost:4321/temp/manifests.js&customActions={"315298b1-ad03-4730-8423-0a07941a96d9":{"location":"ClientSideExtension.ApplicationCustomizer","properties":{"useTeamsites":true,"useCommsites": true,"useHubsites": true,"useTeams": true,"useGraph": true}}}Only two things are individual for this solution. The extension’s GUID starting with 315298b1… and the properties. The latter ones configure the solution. So on installation it can be decided which kind of sites shall appear (useTeamsites:true/false e.g.) in the navigation and if to prefer (useGraph) the Microsoft Graph API or not.
Search for Sites
Searching for SharePoint sites can be done either with SharePoint rest API or Microsoft Graph.
In SharePoint, the search query needs to contain two things: the contentclass to reduce the results to only sites and the WebTemplate to distinct between modern Teamsites and Communication sites for instance. The search operation for modern Communication sites for instance might look like this:
public async readCommsites(searchText: string, start: number, currentSiteUrl: string): Promise<IMenuItem[]> {
    let queryText = `contentclass:STS_Site AND WebTemplate:SITEPAGEPUBLISHING`;
    const searchResponse = await this.searchSites(queryText, start);
...
private searchSites(queryText: string, start: number): Promise<ISharePointSearchResults> {
    const spSearchConfig: ISPHttpClientConfiguration = {
      defaultODataVersion: ODataVersion.v3
    };
    const requestUrl = this.currentSiteUrl + `/_api/search/query?querytext='${queryText}'&selectproperties='Title,Path,SiteLogo,Description,SiteId'&startrow=${start}&rowlimit=${this.pagesize}&sortlist='Created:descending'`;
    return this._spHttpClient.get(requestUrl, SPHttpClient.configurations.v1.overrideWith(spSearchConfig))
        .then((response: SPHttpClientResponse) => {
            return response.json();
        });
  }
Use Graph
Search with Microsoft Graph is slightly different, than using SharePoint rest API. First there is a static endpoint and no given site URL. Next there is a clear entityType which distincts the results between sites and listItems for instance. Finally the above mentioned endpoint needs to be called with a POST request.
public async readCommsites(searchText: string, start: number): Promise<IMenuItem[]> {
    let queryText = `WebTemplate:SITEPAGEPUBLISHING`;
    const searchResponse = await this.searchSites(queryText, start);
....
private async searchSites(queryText: string, start: number): Promise<any> {
    this.client = await this.msGraphClientFactory.getClient('3');
    const requestBody = {
      requests: [
          {
              entityTypes: [
                  "site"
              ],
              query: {
                  "queryString": `${queryText}`
              }
          }
      ]
    };
    const response = await this.client
            .api(`search/query`)
            .version('v1.0')
            .skip(start)
            .top(20)   // Limit in batching!
            .post(requestBody);
    if (response.value[0].hitsContainers[0].total > 0) {
      return response.value[0].hitsContainers[0].hits;
    }
    else return [];
  }
Transform to Menu items
To display the search results in a menu they need to be transformed into correct types. This is done the same for any kind of sites:
private transformSearchSites(response:ISharePointSearchResults): IMenuItem[] {
    const relevantResults: ISharePointSearchResultsTable | null = (response.PrimaryQueryResult !== null) ? response.PrimaryQueryResult.RelevantResults.Table : null;
    const items: Array<IMenuItem> = new Array<IMenuItem>();
    if (relevantResults !== null){
      relevantResults.Rows.forEach((r: any) => {
        items.push({ displayName: r.Cells[0].Value, url: r.Cells[1].Value, iconUrl: r.Cells[2].Value, description: r.Cells[3].Value, key: r.Cells[4].Value });
      });
      return items;
    }
    else {
      return [];
    }
 }
This is for the SharePoint Rest API variant where the access to the result item with r.Cells[1].Value e.g. looks a bit ugly. The same row with Microsoft Graph looks pretty much better. This is because the entityType is well defined (but limited to the given fields):
items.push({ displayName: r.resource.displayName, url: r.resource.webUrl, iconUrl: '', description: r.resource.description, key: r.resource.id });List Teams
To retrieve the list of Teams it is necessary to use Microsoft Graph. Two ways are possible. Either to list all Teams the current user is joined to or retrieve a list of groups that are in fact, Teams, and the user has access to. The latter option will be used here as it also shows Teams which are public.
private async getTeams(): Promise<ITeam[]> {
    this.client = await this.msGraphClientFactory.getClient('3');
    const response = await this.client
            .api(`groups?$filter=resourceProvisioningOptions/Any(x:x eq 'Team')&$expand=members`) // /me/joinedTeams
            .version('v1.0')
            .top(20)   // Limit in batching!
            .get();
    let teams: Array<ITeam> = new Array<ITeam>();
    response.value.forEach((item: ITeam|any) => {
      teams.push({ id: item.id, displayName: item.displayName, description: item.description, mailNickname: item.mailNickname, visibility: '', url: `/teams/${item.mailNickname}`, photo: '', members: item.members.length, createdDateTime: '', teamUrl: '', owners: []});
    });
    return teams;
}
In line 4 the endpoint is constructed, retrieving all groups that are provisioned as Teams. An alternative endpoint would be:
/me/joinedTeamsBut another disadvantage would be that in a result a Team has much less attributes than a Group (although each Team is based on a Group of course).
Deal with Hub sites
As hub sites can be based on any site template the search query looks slightly different than for our previous site queries. In SharePoint the following 2 properties are needed:
contentclass:STS_Site AND IsHubSite:trueWhile with Microsoft Graph the entityType (site) is already preselected and the concentration lies on the essential property:
IsHubSite:trueThe rest is pretty much the same than mentioned above with other site types.
Additionally, if the current site belongs to a hub this hub site can be placed on a home link. To identify, the current site’s HubSiteId needs to be evaluated and all retrieved hub sites can be iterated for this id.
public getHubSiteId(currentSiteUrl: string): Promise<string|null> {
    const requestUrl = `${currentSiteUrl}/_api/site/HubSiteId`;
    return this._spHttpClient.get(requestUrl, SPHttpClient.configurations.v1)
      .then((response) => {
        return response.json();
      })
      .then((jsonResponse: any): string|null => {
        let hubSiteId: string = jsonResponse.value;
        if (hubSiteId !== '00000000-0000-0000-0000-000000000000') {
          return hubSiteId;
        }
        else {
          return null;
        }
      });
};
React.useEffect((): void => {
    if (props.useHubsites && hubsiteId !== null && hubites.length >0) {
      hubites.forEach((h) => {
        if (h.key.indexOf(hubsiteId) > -1) {
          setHomesite({ url: h.url, displayName: h.displayName});
        }
      })
    }
  }, [hubsiteId, hubites]);
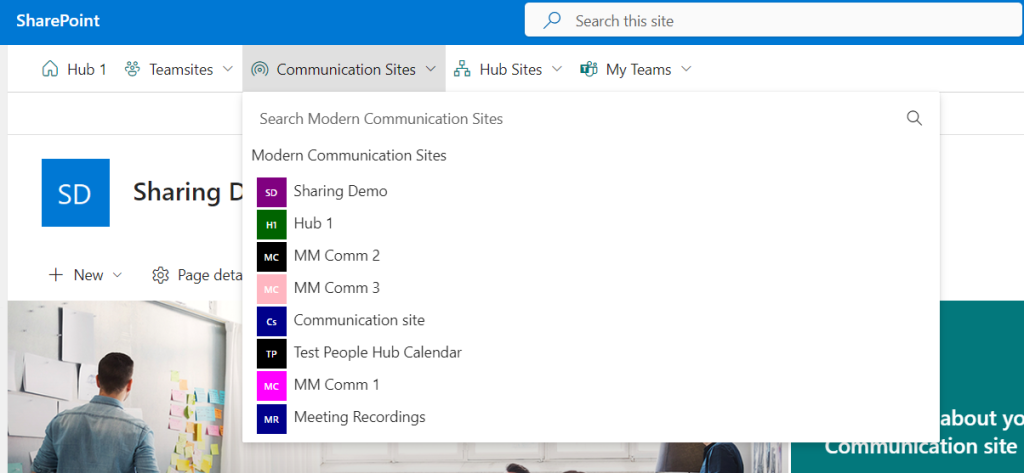
UI: The CommandBar
As you can see from the screenshot on the top for the navigation the FluentUI CommandBar control is used. The rendering itself is pretty simple:
<CommandBar
        className={styles.top}
        items={ commandItems }
        farItems={ farItems }
      />
The commands inside the bar are represented by the commandItems. What happens when one of those is clicked, is, it opens a SubMenu. So how is this built using the example of “Teamsites”?
const teamSitesItem: ICommandBarItemProps = {
  key: 'Teamsites',
  name: 'Teamsites',
  className: `ms-CommandBarItem`,
  iconProps: {
    iconName: 'Group'
  },
  subMenuProps: {
    items: [{
      key: 'Teamsites',
      name: 'Teamsites',
      label: 'Modern Teamsites',
      dataItems: [],
      onRender: renderSubmenu
    }],
    onDismiss: dismissProjects,
    onItemClick: closeMenu
  }
};
Inside a specific service for creating the menu items a static CommandBarItem for “Teamsites” is predefined. The only thing that needs to be added at runtime are the dataItems, which are the transformed search results of our team sites. Additionally interesting is the rendering of the Submenu as custom React component.
const renderSubmenu = (item: any) => {
  let element: React.ReactElement<ISubMenuSitesProps> = React.createElement(SubMenuSites, item);
  return element;
}
The custom React component SubMenuSites gets the whole IContextualMenuItem (item below SubMenuProps above) as a property. With it, it also gets the dataItems to be rendered:
export const SubMenuSites: React.FC<ISubMenuSitesProps> = (props) => {
  let listElements: JSX.Element[] = [];
    listElements = props.dataItems.map((item) => {
      return (<li className={styles.menuListItem}>
                <SiteIcon
                  siteTitle={item.displayName}
                  iconAcronym={item.iconAcronym?item.iconAcronym:''}
                  iconColor={item.iconColor?item.iconColor:''}
                  iconUrl={item.iconUrl?item.iconUrl:''} />
                <a className="ms-fontColor-neutralPrimary ms-fontColor-themePrimary--hover" onClick={() => window.open(item.url , '_self')} >{item.displayName}</a>
              </li>);
    });
  return (
    <div className={styles.subMenu}>
      <div className="ms-Grid-row">
        <div className="ms-Grid-col ms-sm12 ms-md6 ms-lg6 ms-xl6 ms-xxl6 ms-xxxl6">
          <div className={styles.menuHeader}>
            <span className="ms-font-xl ms-fontColor-themePrimary">{props.label}</span>
          </div>
          <ul className={styles.menuList}>{listElements}</ul>
        </div>
      </div>
    </div>
  );
}
The rendering itself it’s pretty straightforward. Worth to note is how the dataItems or the label (“Modern Teamsites”) is accessed from the properties.
This were the essential things contained in the solution. For whole reference the full solution is available for you in my GitHub repository. Beside the navigation menu items, on the right there is additional functionality around security and permissions on the given site. But that’s another blog post, stay tuned.

|
Markus is a SharePoint architect and technical consultant with focus on latest technology stack in Microsoft 365 Development. He loves SharePoint Framework but also has a passion for Microsoft Graph and Teams Development. He works for Avanade as an expert for Microsoft 365 Dev and is based in Munich. In 2021 he received his first Microsoft MVP award in M365 Development for his continuous community contributions. Although if partially inspired by his daily work opinions are always personal. |

Can we add serachbar in the command bar itself to avoid the clicks?
LikeLike
Don’t get the question 100% but for the CommandBar itself there is much more than my little sample showed. You can check the documentation on the FluentUI homepage or with a more concrete question I can probably direct you to the sample
LikeLike