
As I started to achieve parity in my samples (NodeJS and C#) on Teams applications here comes the NodeJS version of my recent sample.
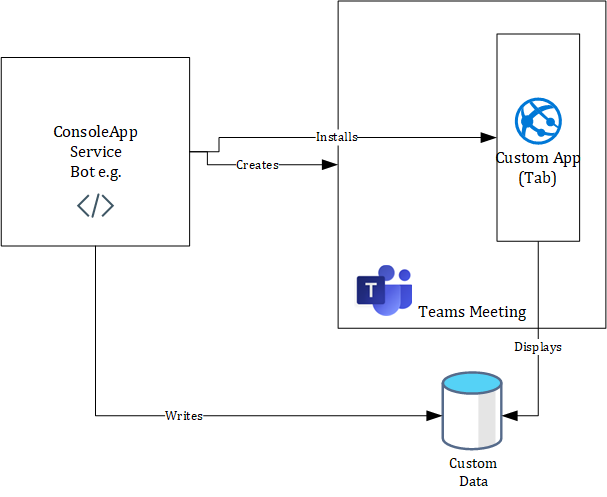
The scenario is to automatically create a teams meeting, install a custom meeting app which shall display custom data that was written during installation to an Azure storage.
To make it easy, the context that shall execute all the things will be simulated by a simple NodeJS Console app. In reality, this can also be a web service, a bot or whatever. In a high-level architecture it can look like this:
But as a benefit here it is shown how to establish a NodeJS console app for M365 development as well.
Content
Setup
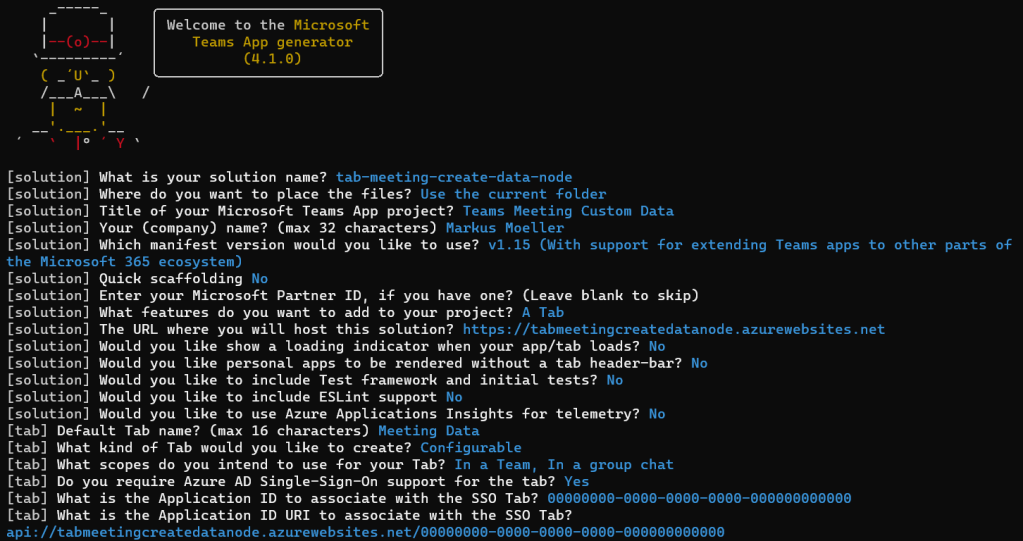
For setup a simple Teams configurable tab application is created by yo teams:
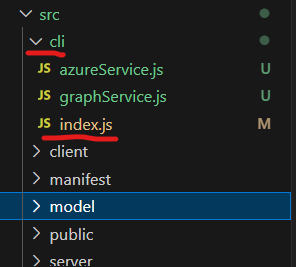
To include the console application some additional steps are necessary. First an index.js needs to be created in a folder outside server and client. In that file all the code can be placed. But before there is a need to tell Node how to execute it. The package.json needs to be extended like this:
{
  "name": "tabmeetingcreatedatanode",
  "version": "1.0.0",
  "description": "Generated by yoteams, https://aka.ms/yoteams",
  "main": "src/cli/index.js",
  "scripts": {
    ...
  },
  "dependencies": {
    "@azure/app-configuration": "^1.4.1",
    "@azure/data-tables": "^13.2.2",
    "@azure/identity": "^3.3.1",
    ...
  },
  "devDependencies": {
    ...
  },
  "browserslist": [
    ...
  ],
  "bin": {
    "create": "./src/cli/index.js"
  },
  ...
}
Now, the Console app can simply be started like this (from the current solution folder):
node .
Let’s keep this for the moment, but further configuration options can be found here.
Authentication
To simplify authentication and further Microsoft Graph requests the JavaScript SDK is used and installed:
npm install @microsoft/microsoft-graph-client --save
require("dotenv").config();
const azure = require('@azure/identity');
const authProviders = require('@microsoft/microsoft-graph-client/authProviders/azureTokenCredentials');
const graph = require('@microsoft/microsoft-graph-client');
const credential = new azure.ClientSecretCredential(
        process.env.TENANT_ID,
        process.env.MICROSOFT_APP_ID,
        process.env.MICROSOFT_APP_PASSWORD
);
const authProvider = new authProviders.TokenCredentialAuthenticationProvider(credential, {
    scopes: ['https://graph.microsoft.com/.default'],
});
const graphClient = graph.Client.initWithMiddleware({ authProvider: authProvider });
const userId = await getUserId(graphClient, userPrincipalName);
...
A very simple user-delegated authentication is not available here. So against my .Net sample pendant this will be skipped here and the focus is put on an application or client-credential process. TENANT_ID, CLIENT_ID and SECRET are necessary and used for an authentication provider and that’s all. Having a client, the Graph requests can be started with requesting a userId for a given UPN. Next it can be used to create a meeting which is an event for that user at first:
Meeting creation
The creation of a meeting needs a bigger event object. Two things are most important here. The start date is simply the current one. The end date is calculated by adding one hour. Also, the event is declared as an onlineMeeting.
async function createEvent (client, meetingSubject, userPrincipalName, userID, dummyAttendee) {
    const startDate = new Date();
    const endDate = new Date(startDate);
    const startHours = startDate.getHours();
    endDate.setHours(startHours + 1);
    const event = {
        subject: meetingSubject,
        isOnlineMeeting: true,
        start: {
            dateTime: startDate.toISOString(),
            timeZone: 'Europe/Berlin'
        },
        end: {
            dateTime: endDate.toISOString(),
            timeZone: 'Europe/Berlin'
        },
        Organizer :
            {
                emailAddress: { address: userPrincipalName }
            },
        attendees: [
        {
            emailAddress: {
            address: dummyAttendee
            },
            type: 'required'
        }
        ]
    };
    const result = await client.api(`/users/${userID}/events`)
        .post(event);
    return result.onlineMeeting.joinUrl;
}
The result is an onlineMeeting joinUrl. This can be used to evaluate the corresponding chatId. Here the custom meeting app can be installed in. The Retrieval looks like this:
async function getMeetingChatId (client, userID, joinUrl) {
    const onlineMeeting = await client.api(`/users/${userID}/onlineMeetings`)
        .filter(`joinWebUrl eq '${joinUrl}'`)
        .get();
    const chatId = onlineMeeting.value[0].chatInfo.threadId;
    console.log(`OnlineMeeting with ChatID ${chatId}`);
    return chatId;
}
Although filtering for “the” joinUrl the result is an array but trustfully the first one can be picked as the true chat object.
App installation
For the app installation first the tenant specific appId needs to be evaluated. This can be done by having the information of the app’s display name:
async function getAppId (client) {
    const apps = await client.api('/appCatalogs/teamsApps')
                .filter("distributionMethod eq 'organization' and displayName eq 'Teams Meeting Custom Data'")
                .get();
    const appId = apps.value[0].id;
    return appId;
}
With the appId and the chatId from above the app can be installed with the following request:
async function installAppInChat (client, appId, chatId) {
    const requestBody =
    {
        "teamsApp@odata.bind": `https://graph.microsoft.com/v1.0/appCatalogs/teamsApps/${appId}`
    };
    await client.api(`/chats/${chatId}/installedApps`)
            .post(requestBody);
    return true;
}
Last not least the app also needs to be installed or made visible as a tab. This can be achieved with the following request:
async function installTabInChat(client, appId, chatId, customerId) {
    const teamsTab = {
        displayName: 'Custom Data',
        'teamsApp@odata.bind': `https://graph.microsoft.com/v1.0/appCatalogs/teamsApps/${appId}`,
        configuration: {
            entityId: customerId,
            contentUrl: `https://${process.env.PUBLIC_HOSTNAME}/meetingDataTab/?name={loginHint}&tenant={tid}&group={groupId}&theme={theme}`,
            removeUrl: `https://${process.env.PUBLIC_HOSTNAME}/meetingDataTab/remove.html?theme={theme}`,
            websiteUrl: `https://${process.env.PUBLIC_HOSTNAME}/meetingDataTab/?name={loginHint}&tenant={tid}&group={groupId}&theme={theme}`
        }
      };
      await client.api(`/chats/${chatId}/tabs`)
          .post(teamsTab);
}
Interesting point is the usage of the entityId which can be used to “transport” custom data. The meetingID or chatID is not necessary as it is available anyway in the meeting context but the “custom” customerId will be valuable later accessing the Azure Table as a “second” key.
Custom data
On top of the meeting creation and app installation some custom data shall be transported to and made visible in the meeting. This can be easily done with the installed app. The only challenge is the data storage. Originally the preferred way should be an OpenExtension via Microsoft Graph with the meeting itself. Unfortunately, this is not (yet?) possible. (You would need to get back from the chat via onlineMeeting to the event (only this supports openextensions) of the organizer but cannot filter by onlineMeeting/joinUrl backwards; try yourself with Graph Explorer) So another option needs to be found. In the past I already worked with Azure App Configuration. Additionally another option, an Azure Table is shown here.
Azure App configuration
Azure App Configuration is good for storing key value pairs. The meetingID is a good portion for the key, combined with the app name and the attribute name. So write some customer data for instance would simply look like this:
async function saveAppConfig (meetingID, newConfig) {
    const client = getAppConfigClient();
    if (newConfig.Name) {
      await client.setConfigurationSetting({ key: `TEAMSMEETINGSERVICECALL:${meetingID}:CUSTOMERNAME`, value: newConfig.Name });
    }
    if (newConfig.Phone) {
      await client.setConfigurationSetting({ key: `TEAMSMEETINGSERVICECALL:${meetingID}:CUSTOMERPHONE`, value: newConfig.Phone });
    }
    if (newConfig.Email) {
      await client.setConfigurationSetting({ key: `TEAMSMEETINGSERVICECALL:${meetingID}:CUSTOMEREMAIL`, value: newConfig.Email });
    }
    if (newConfig.Id) {
      await client.setConfigurationSetting({ key: `TEAMSMEETINGSERVICECALL:${meetingID}:CUSTOMERID`, value: newConfig.Id });
    }
}
While the storing of the configuration value is pretty straightforward, the client initialization depends on the connection string. If it starts with “Endpoint” a simple secret string can be expected otherwise a credential client or a managed identity is used.
function getAppConfigClient () {
    const connectionString = process.env.AZURE_CONFIG_CONNECTION_STRING;
    let client;
    if (connectionString.startsWith('Endpoint=')) {
      client = new appConfigClient.AppConfigurationClient(connectionString);
    }
    else {
      const credential = new azure.DefaultAzureCredential();
      client = new appConfigClient.AppConfigurationClient(connectionString, credential);
    }
    return client;
}
If you already have a suiting App Configuration resource that can be used, this is a cheap and suitable solution. Otherwise, Azure Table might be the cheaper and better option:
Azure Table
Writing the same data to an Azure Table row would first require a partition and row key. Essential once again would be the meetingID as this is is the only data available in the meeting (app) from the very beginning. So writing the same data as above would look like this:
async function createCustomer(meetingID, customer)
{
    const tableClient = getAZTableClient();
    const tableEntity =
    {
        partitionKey: meetingID,
        rowKey: customer.Id,
        Name: customer.Name,
        Email: customer.Email,
        Phone: customer.Phone
    };
   await tableClient.createEntity(tableEntity);
}
For the storing a meetingID and the customer object is taken. The meetingID is taken for the partition key and the id from the customer is taken for the row key. The rest of the data is written as custom attributes.
Similar to the Azure app configuration at first a client needs to be established. Therefore, more than one configuration value is required, an accountName and an storageAccountKey. For simplicity it’s taken from the env settings. I must not explain this SHOULD NOT be done in enterprise scenarios where resources like Azure app configuration or Azure key vault should be matter of choice?
function getAZTableClient () {
    const accountName = process.env.AZURE_TABLE_ACCOUNTNAME;
    const storageAccountKey = process.env.AZURE_TABLE_KEY;
    const storageUrl = `https://${accountName}.table.core.windows.net/`;
    const tableClient = new TableClient(storageUrl, "Customer", new AzureNamedKeyCredential(accountName, storageAccountKey));
    return tableClient;
}
While the accountName is used for the identifying storageUrl the storageAccountKey is used creating the client directly another (here hardcoded) parameter is the Table name (“Customer”).
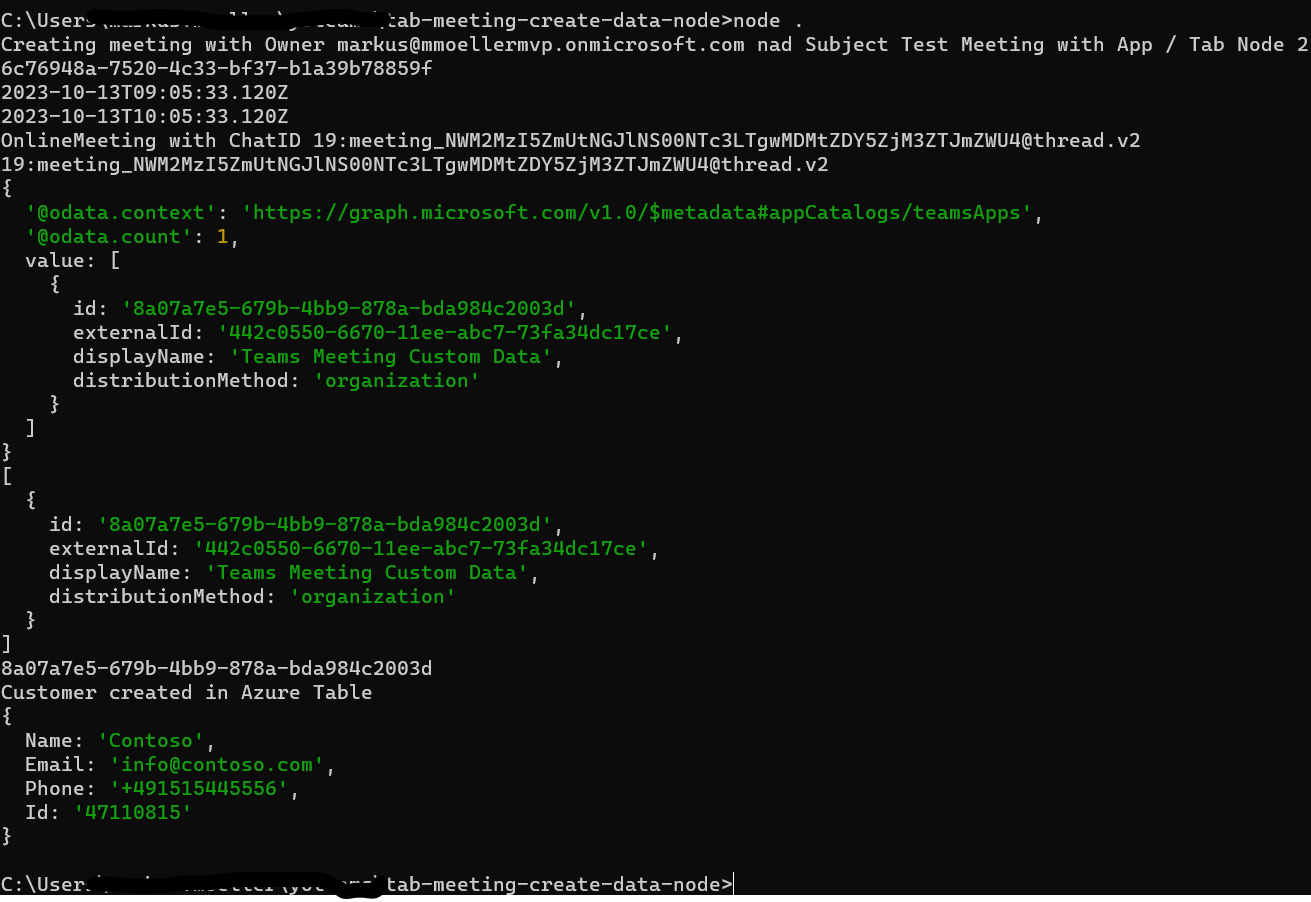
The whole process of the console app may look like this:
Teams meeting app (display custom data)
Once a meeting is created, the custom app is installed and the custom data is written to a storage of your choice, the first part is done. Now in the second part the custom app needs to ensure before as pre-meeting experience or during a running meeting (in-meeting experience) the custom data can be made visible again. Therefore, a simple tab needs to access the storage, pick the right values and display the custom data.
This post once again will omit to explain the very basics of a teams meeting tap application. This in detail is explained here. So the concentration is put on retrieving the custom values, may it come from Azure app configuration or an Azure table.
Azure App configuration
After another client creation the reading of the configuration values looks nearly the same way than during the writing. The only thing that is needed is the meetingID of course to construct the key.
export const retrieveConfig = async (meetingID: string): Promise<ICustomer> => {
  const client = getClient();
  let customerName  = "";
  let customerPhone  = "";
  let customerEmail  = "";
  let customerId  = "";
    const nameSetting = await client.getConfigurationSetting({ key: `TEAMSMEETINGSERVICECALL:${meetingID}:CUSTOMERNAME`});
    customerName = nameSetting.value!;
    const phoneSetting = await client.getConfigurationSetting({ key: `TEAMSMEETINGSERVICECALL:${meetingID}:CUSTOMERPHONE`});
    customerPhone = phoneSetting.value!;
    const emailSetting = await client.getConfigurationSetting({ key: `TEAMSMEETINGSERVICECALL:${meetingID}:CUSTOMEREMAIL`});
    customerEmail = emailSetting.value!;
    const idSetting = await client.getConfigurationSetting({ key: `TEAMSMEETINGSERVICECALL:${meetingID}:CUSTOMERID`});
    customerId = idSetting.value!;
  return Promise.resolve({ Name: customerName, Phone: customerPhone, Email: customerEmail, Id: customerId });
};
Azure Table
Also here at first a client is needed but the details will be omitted as they were shown above, already. The interesting part is the request for the table entity. As seen above during the write process an entity is uniquely defined by a partition key and a row key. One was the meetingID and the other one the customerId.
export const getCustomer = async (customerID: string, meetingID: string): Promise<ICustomer> => {
    const tableClient = getAZTableClient();
    const customerEntity = await tableClient.getEntity(meetingID, customerID);
    const customer = {
        Name: customerEntity.Name as string,
        Email: customerEntity.Email as string,
        Phone: customerEntity.Phone as string,
        Id: customerEntity.rowKey as string
    };
    return customer;
};
So the backend request was still pretty straightforward. But where do the values come from? Therefore, a look to the client side is necessary. On the event hooks it’s verified that entityId and meetingId exist. The entityId, remember from above, is the “transported” customerId. Above it was shown how to write it during app installation. Here it is shown how to access it during application runtime.
useEffect(() => {
    if (inTeams === true) {
      authentication.getAuthToken({
        resources: [`api://${process.env.PUBLIC_HOSTNAME}/${process.env.TAB_APP_ID}`],
        silent: false
      } as authentication.AuthTokenRequestParameters).then(bootstraptoken => {
        setToken(bootstraptoken);
        app.notifySuccess();
      }).catch(message => {
        setError(message);
        app.notifyFailure({
          reason: app.FailedReason.AuthFailed,
          message
        });
      });
    }
  }, [inTeams]);
  useEffect(() => {
    if (context) {
      const meetingID: string = context?.meeting?.id ? context?.meeting?.id : '';
      setMeetingId(meetingID);
      setEntityId(context?.page.id); // EntityId = customerId
    }
  }, [context]);
  useEffect(() => {
    if (entityId && meetingId && token) {
      loadCustomer();
    }
  }, [entityId, meetingId, token]);
In the first event hook it is checked if the app is running in teams and if so an authentication to retrieve an id or bootstrap token is executed. In the second one under the condition there is a context two variables from the context are requested. In the third one another condition must be met: The two variables (entityId and meetingId) and the token are available, then the custom data is loaded.
Client site the load function is a simple Axios request:
const loadCustomer = () => {
    Axios.get(`https://${process.env.PUBLIC_HOSTNAME}/api/customer/${entityId}/${meetingId}`, {
                responseType: "json",
                headers: {
                  Authorization: `Bearer ${token}`
                }
    }).then(result => {
      if (result.data) {
        setCustomer(result.data);
      }
    })
    .catch((error) => {
      console.log(error);
    })
  };
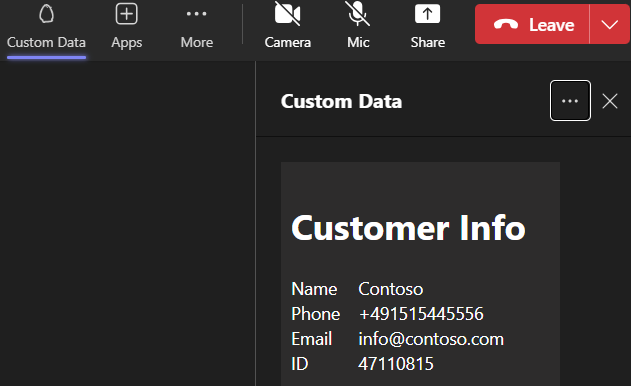
In reality the result can look like this in a in-meeting experience inside the side-panel:
This rebuild of my recent sample explicitly showed how to build a NodeJS console application. It showed how to use Microsoft Graph for creating the meeting and install an app in it. It finally showed how to write some custom data to some Azure storage options and how to retrieve it back in a Teams meeting application. I hope I pointed out the key points but for your reference see the whole solution in my GitHub repository.

|
Markus is a SharePoint architect and technical consultant with focus on latest technology stack in Microsoft 365 Development. He loves SharePoint Framework but also has a passion for Microsoft Graph and Teams Development. He works for Avanade as an expert for Microsoft 365 Dev and is based in Munich. In 2021 he received his first Microsoft MVP award in M365 Development for his continuous community contributions. Although if partially inspired by his daily work opinions are always personal. |
